

Jira Cloud: Automating Entra ID User Attribute Updates via Automation and Azure Runbook
In my previous guides, we explored how to leverage Jira or Jira Service Managements robust Automation and Azure Runbooks to streamline group membership management and user provisioning in Microsoft 365. In this post, we’ll dive into another powerful use case: automating the update of user attributes like city, state, and phone number directly from Jira Cloud.
To get started, let’s walk through the steps involved in setting up this automation.
Create the Azure Automation Account
First up, we’ll set up an Azure Runbook. This will use a PowerShell script to create the new user account.
- Log in to the Azure Portal.
- Navigate to Automation Accounts:
- Search for “Automation Accounts” in the search bar.
- Click + Create to set up a new Automation Account.
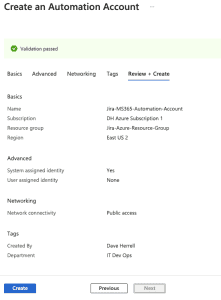
- Provide the required details:
- Subscription: Select your Azure subscription.
- Resource Group: Choose or create a resource group.
- Name: Enter a name for your Automation Account.
- Region: Select your preferred region.
- Click Next

- Under Advanced, choose System Assigned under Managed Identities. We will go over why this may be your best option later.
- Networking tab, ensure you have public access enabled for your connectivity configuration.
- Setup your Tags (Highly recommended for housekeeping).
- Click Review + Create and then Create.
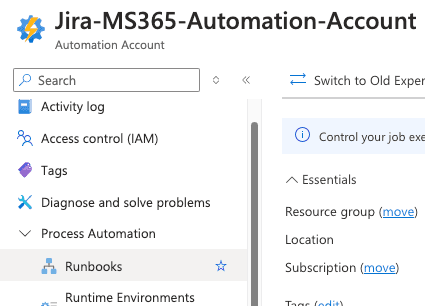
After your Automation Account has been created, Go to the resource.
Create Runbook
Now, to set up your new runbook. Under the Process Automation blade, click the arrow to expand and choose Runbooks.
You can delete the two tutorial runbooks if you wish. They are handy to look over for setup and ideas.
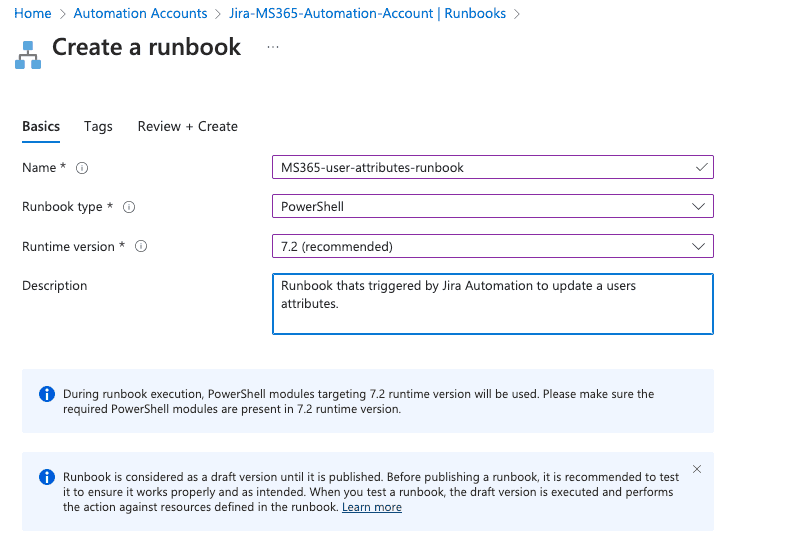
- Next, click + Create to create a new runbook.
Provide the needed details
- Click Create new.
- Enter a name for your runbook.
- Select PowerShell as the runbook type.
- Choose ‘Select from existing’ for the runtime environment and select PowerShell-7.2 (or the latest release). This is necessary to use the MS Graph API.
- Add a description for your runbook.
- Optionally, add tags to categorize your runbook.
- Click Review + Create.
- Once validation is complete, click Create.
- Allow 2-3 minutes for the runbook to be created.
Our runbook will need specific PowerShell modules that aren’t installed by default.
To add them:
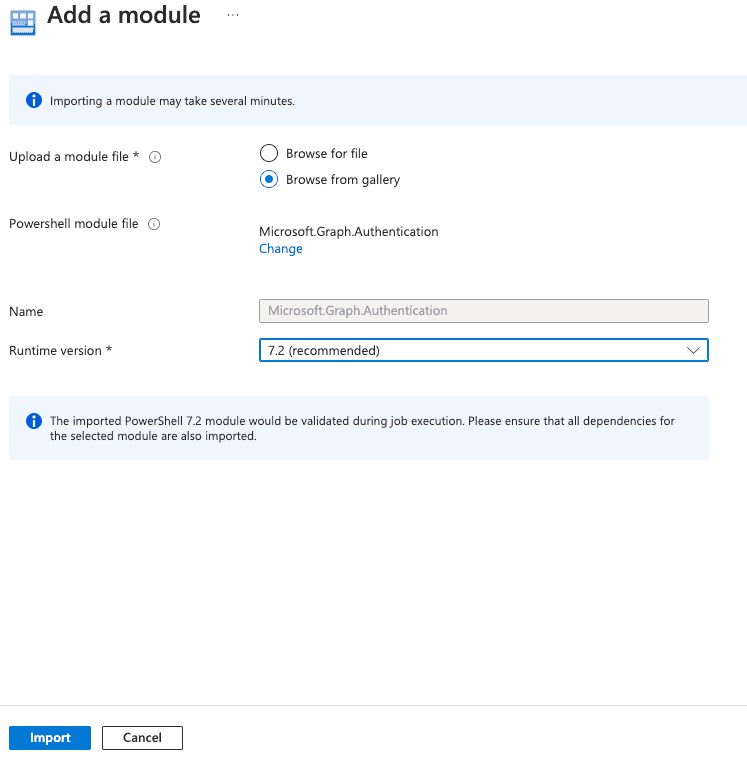
- Click the + Add a module button at the top.
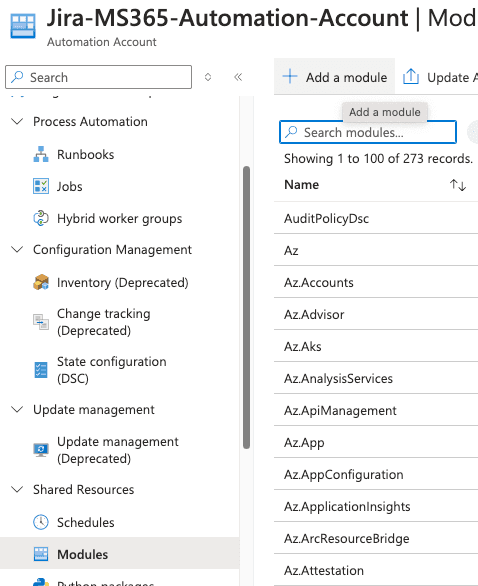
- Click ‘Browse from the gallery.’
- Search for ‘Microsoft.Graph.Authentication’ in the module gallery.
- Select the latest version of the module.
- Click
- Choose the latest runtime version for your module.
- Click Import.
It might take a little while to import the Microsoft.Graph.Authentication module. You can check its progress by searching for it in the module gallery. Once it says Available, you’re ready to use it!
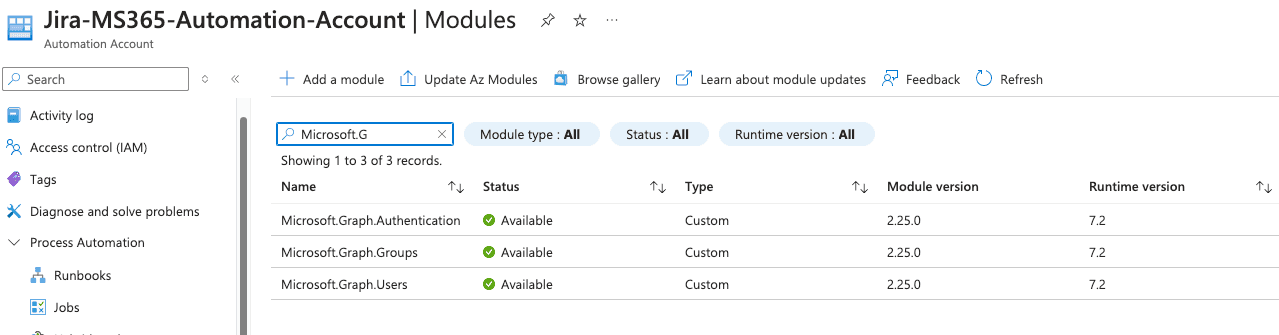
Continue the same steps above to add the other modules you’ll need. You can add modules while others are being installed:
Microsoft.Graph.UsersMicrosoft.Graph.Groups
You should have a similar view:
To enable your runbook to create users, we need to grant it permissions:
- Go to Account Settings, choose Identity.
- You’ll see a system-assigned managed identity is already enabled.
- Click Add role assignment.
- Set the scope to your Azure subscription.
- Assign the Contributor role (or create a custom role with necessary permissions which is recommended).
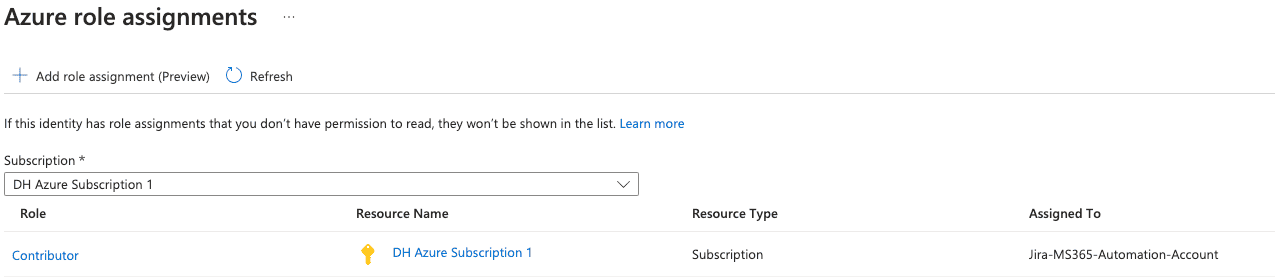
- Click Save.
- Copy the object ID of the managed identity for future reference. We’ll be using this coming up.
Setup permission for your Object ID
We have one more step: Give our new Managed identity permissions to update user attributes. Ensure you have the Object ID from your Managed Identity from the steps above.
- In a new tab, Go to the Azure portal.
- Choose the Microsoft Entra ID blade
- Expand Manage, choose Enterprise applications.
- On the search bar, search for the Object ID you have copied.
- An application should show up; click on the name.
- Expand the Security area, choose Permissions, and you’ll notice there are no Permissions set for your application.
Since we are updating user attributes we need to give this application Microsoft Graph – User.ReadWrite.All permissions. We also need the Directory.ReadWrite.All permissions as well. There is currently only one way to do this: through PowerShell.
The easiest way to do this is to open the Cloud Shell at the top of your Azure portal.

Run the following PowerShell Script. Make sure you replace **SUPERCOOLOBJECTID** with the Object ID of the application you just searched for.
The Cloud console will run.
Choose A for Yes to All to install all the required Graph modules. This will run for a few minutes.
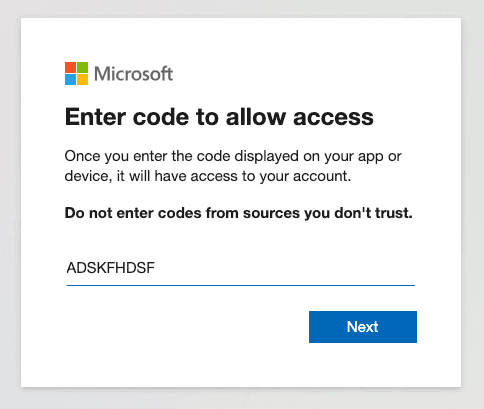
It will then prompt you to Sign into a web browser and enter a code. Simply copy the URL (or you can click the URL) and type the code into your browser.
- Enter the code to allow access. Click Next.
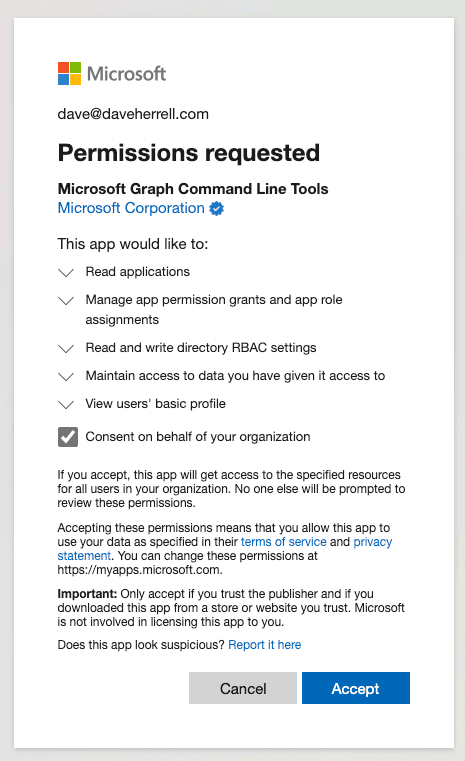
- The next screen will ask you to sign into your account to verify.
- After you log in, you will need to consent on behalf of your company to give permissions to the Graph Command Line Tools. If you are okay with this, click Accept.
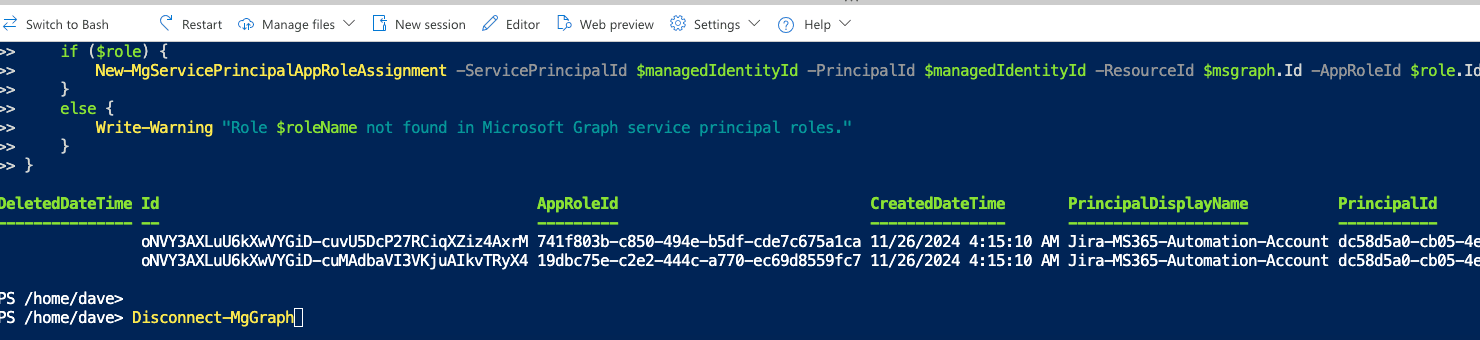
You can now close the tab where you granted admin consent. Return to the tab where your Azure Cloud Shell is running. The permission grant process should be complete, and your cloud shell should be disconnected from Microsoft Graph.
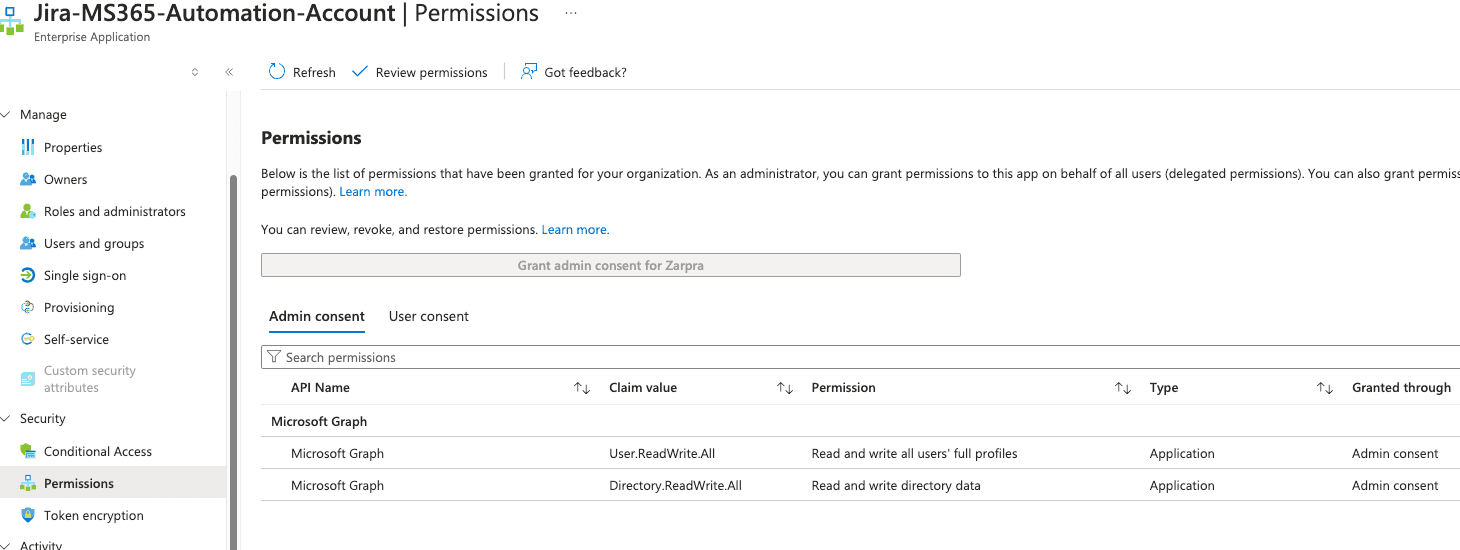
To verify that the permissions have been added successfully:
- Navigate back to the Permissions tab of your enterprise application.
- You should now see the User.ReadWrite.All and Directory.ReadWrite.All permission listed, with admin consent granted.
Let’s go back to our runbook that we created. Click the runbook and make sure you’re in the runbooks Overview view.
To edit your runbook:
- Navigate to our runbook in the Azure portal.
- Click ‘+ Edit’ and choose Edit in the portal.
- Expand the Runbooks section on the left and select the correct runbook.
- We’re ready to add our PowerShell script.
Click Save. Click Publish.
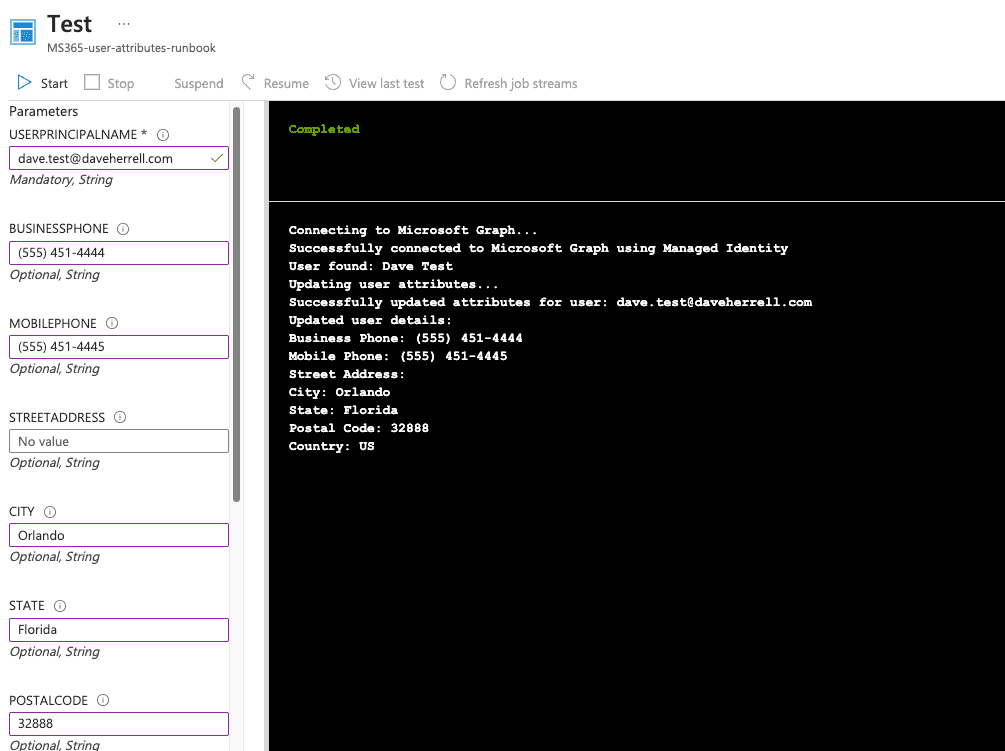
Test Runbook
Before proceeding, we should test our runbook to ensure it works as expected. After all, if it doesn’t work here, the Jira automation definitely wont work.
- In the runbook editor, navigate to the Test pane.
- Fill in the necessary parameters for the runbook to execute.
- Click the Start button to initiate the test.
- Please allow up to 3-5 minutes for the test to complete.
- Once the test finishes, review the output to verify that it ran successfully and without errors.
Within the Azure Portal, expand the Microsoft Entra bade, expand Manage, and choose Users.
There, you will find your newly created user from your test run.

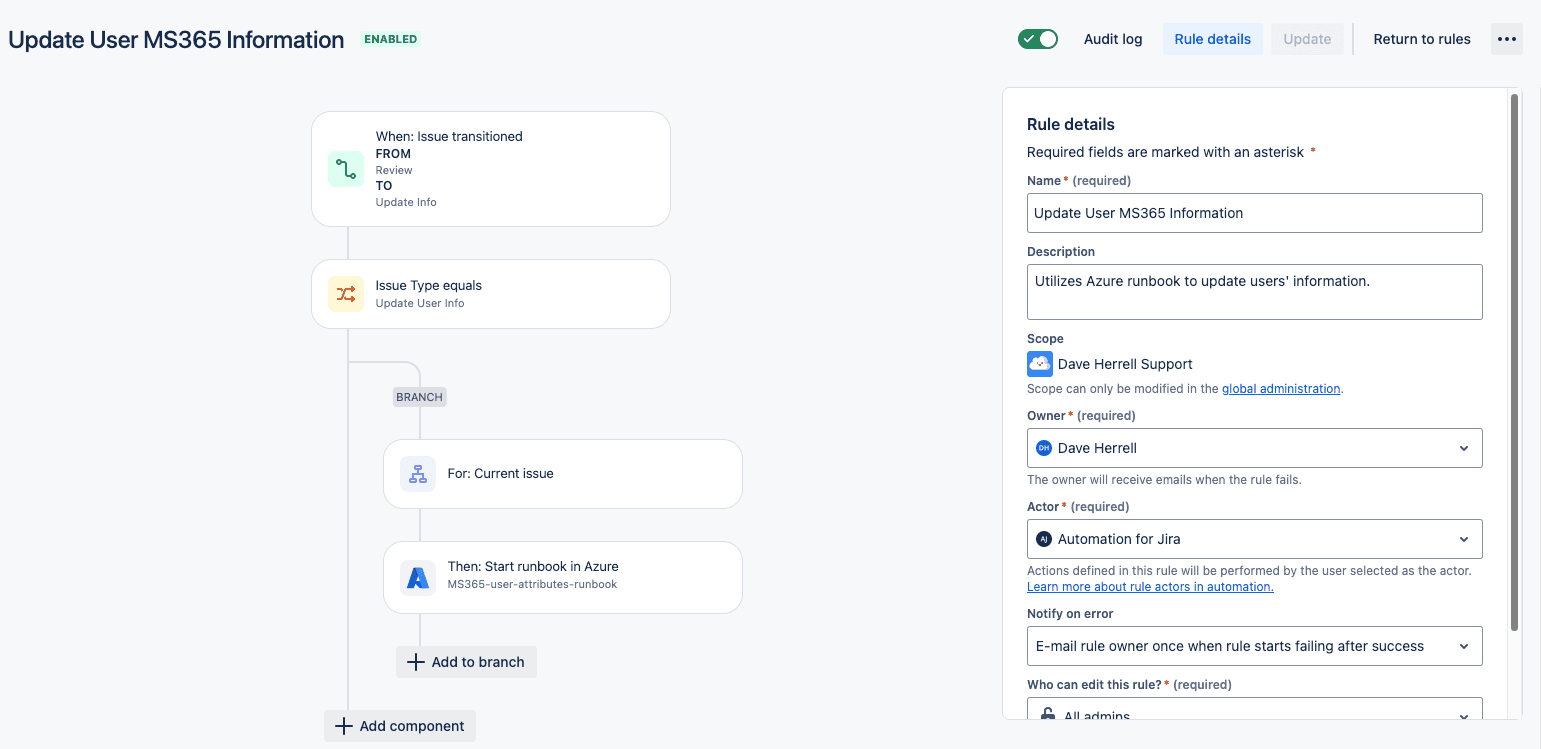
- Click your Project settings and go to Automation.
- Choose Create Rule.
- Our trigger will be when the Issue is Transitioned; select this option.
- Our criteria are from status: Review to status Update Info.
- Click Next.
![]()
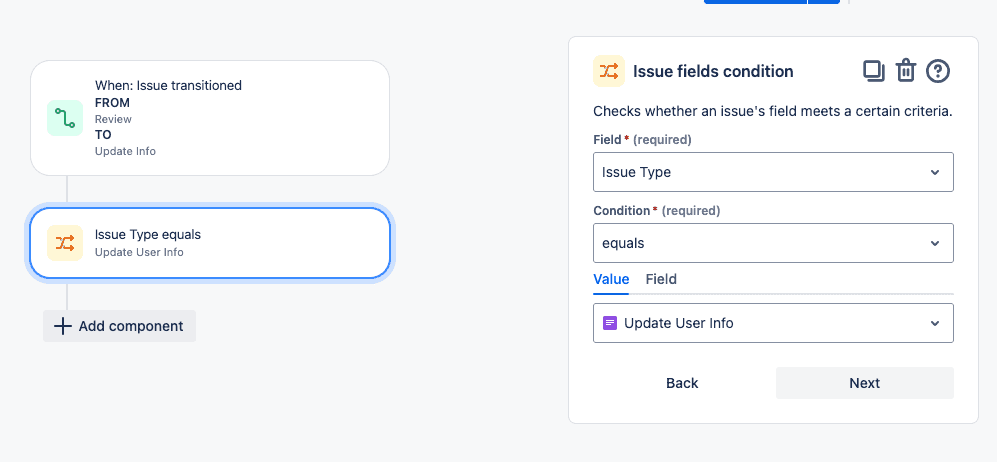
Let’s add a safeguard to ensure somebody has reviewed the info and set the review field to yes.
- Add the IF: Add a condition
- Choose Issue fields condition.
- Under Field, we choose the Issue Type.
- Condition, equals
- Value is Update User Info
- Click Next.
Let’s add a branch component to work only off the issue that triggered it. Choose FOR EACH: Add a branch, and select the Branch rule / related issues. Choose Current Issue (default) on the next screen and click Next.
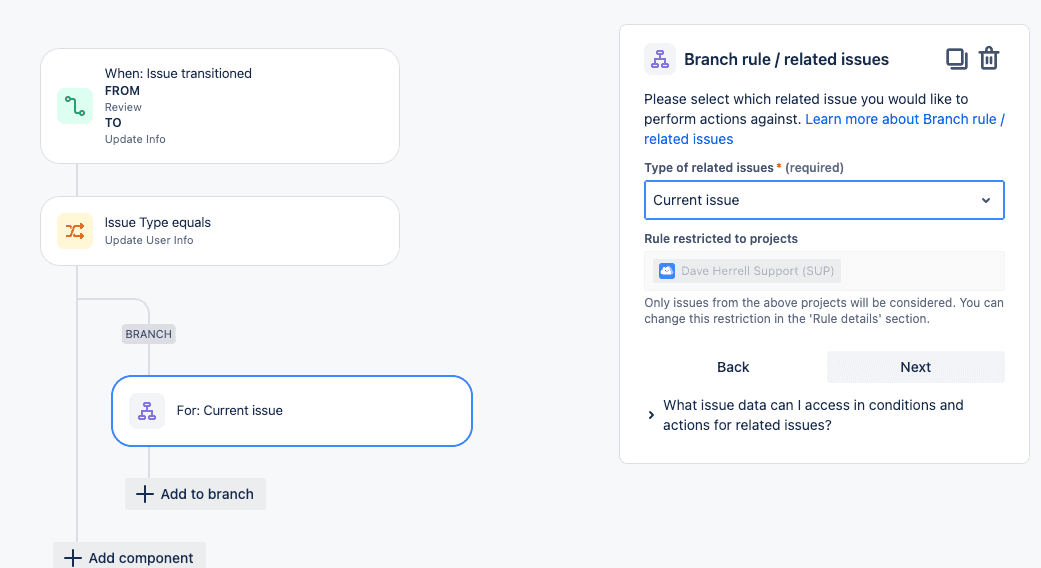
- Click the Add to branch under your new Branch. Select the THEN: add an action.
- Search or scroll down to the Start runbook in Azure and choose it.
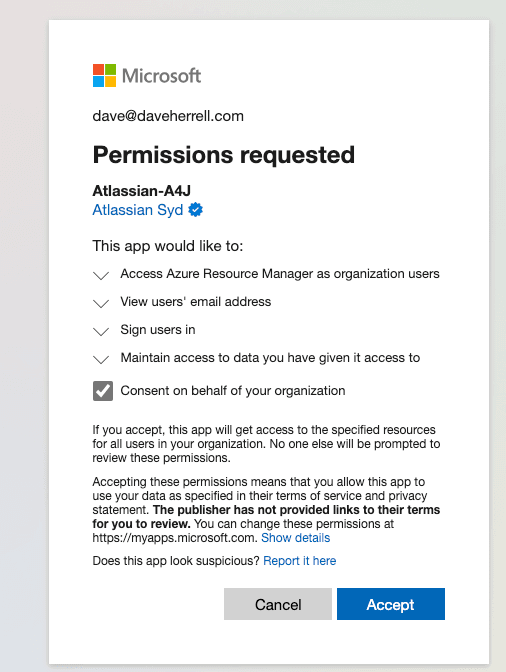
- Next, we need to Connect our Azure account to our Jira account. Click the Connect This will open a new window.
- Sign in to your MS365 account if you’re not already signed in.
- Review and approve the permissions request on behalf of your organization. Click
- This tab should close out, taking you back to your Jira Automation.
- Within Jira Automation, Select your Azure Subscription name
- Select the Resource Group that has your automation account.
- Select the Automation account that holds your runbook.
- Lastly, select the runbook we just set up.
The last thing we need to do is bind the Key-value pairs so the payload we send to Azure has the information to give to our runbook script.
In our simple example, we’re going to map some basic user attributes like city, state, phone.
Table below depicts how we’ll be mapping our key-value pairs.
StreetAddress | String | {{issue.customfield_10065}} |
MobilePhone | String | {{issue.customfield_10066}} |
State | String | {{issue.customfield_10067}} |
City | String | {{issue.customfield_10068}} |
BusinessPhone | String | {{issue.customfield_10069}} |
PostalCode | String | {{issue.customfield_10070}} |
UserPrincipalName | String | {{issue.customfield_10071}} |
You must insert the custom field IDs that your Onboarding tickets use. Check out the handy guide here if you need help finding the Jira custom field IDs.
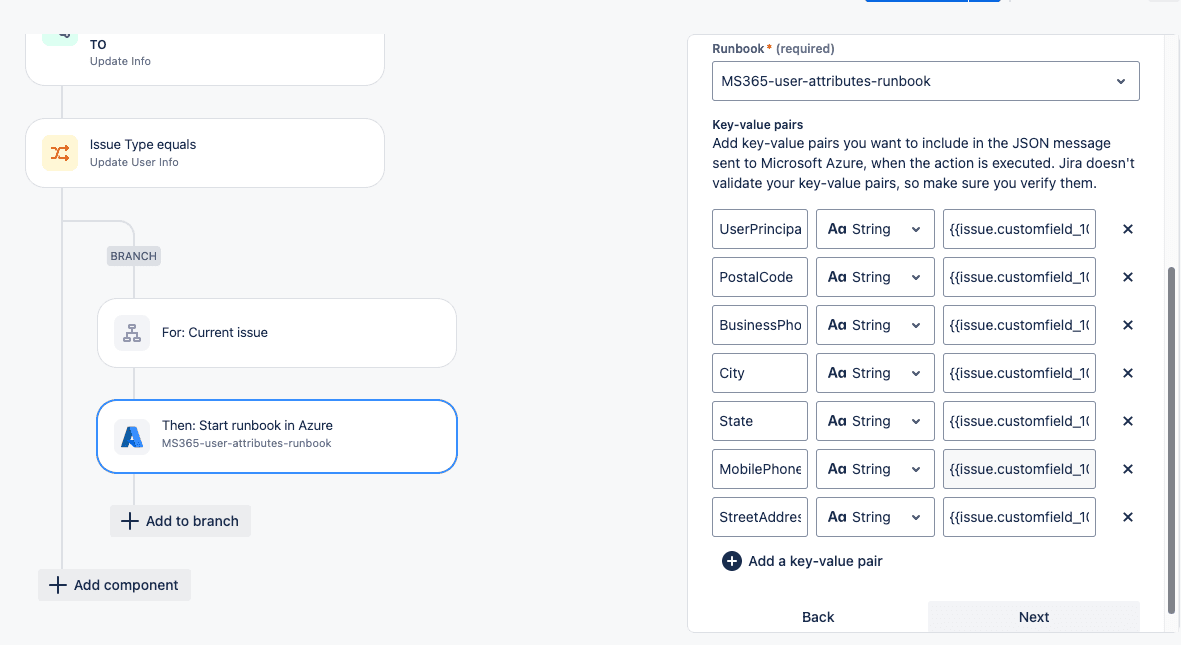
Once you’ve added all your key-value pairs, select Next.
Click the Rule Details at the top.
- Name your rule
- Set a description.
- Set the Automation Owner.
- Set the Actor (typically Automation for Jira)
- Select if you want an email if this rule errors out.
- Who can edit the rule?
- Lastly, click Turn on Rule.
Let’s Test It!
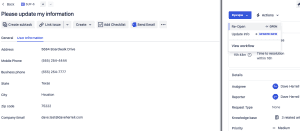
The last thing to do is test our automation and runbook! We’ll test with the newly created User Update test ticket with the required information filled out.
Per our requirements, we’re going to transition the ticket from Review to Update Info to trigger the automation.
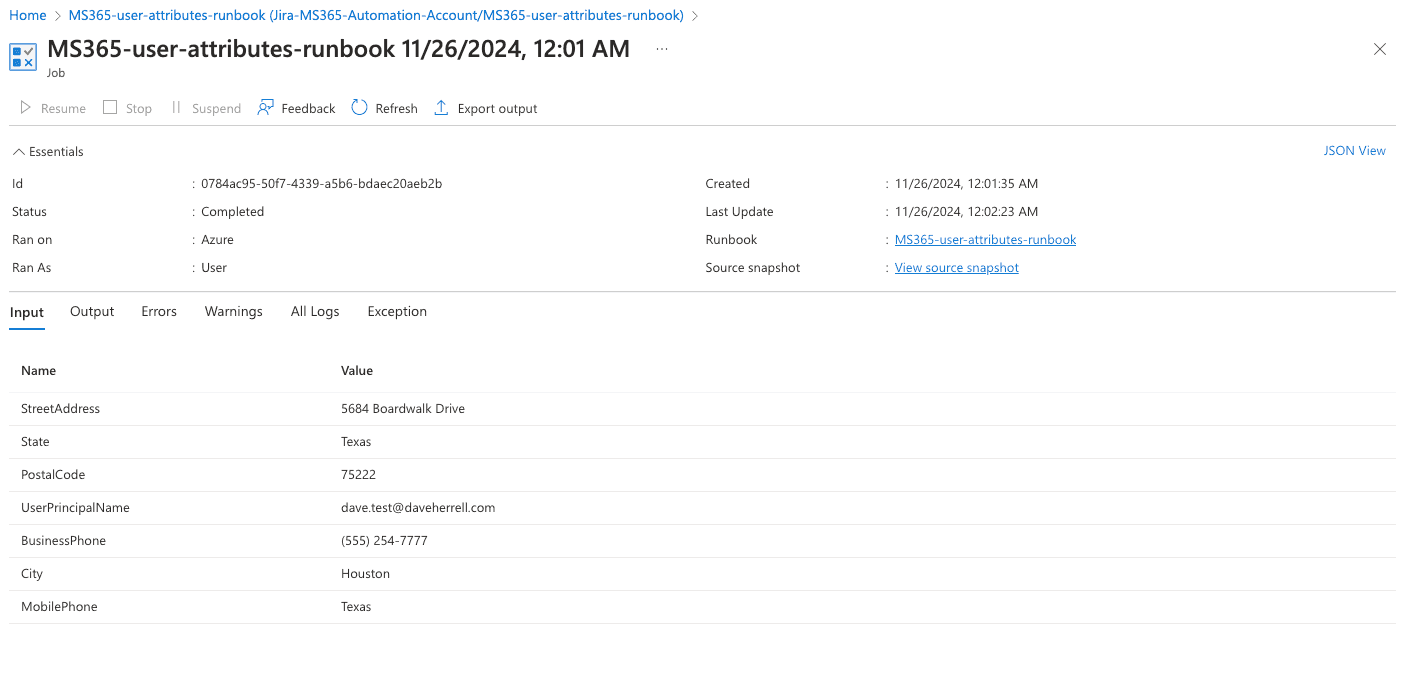
If we go to our Jira Automation rule and click the Audit log, we can see the runbook request was submitted.

Back in the Azure portal, if we open our runbook, we should see our runbook either running or completed already. If you click the Completed Status, you will see our Inputs, Errors, etc.
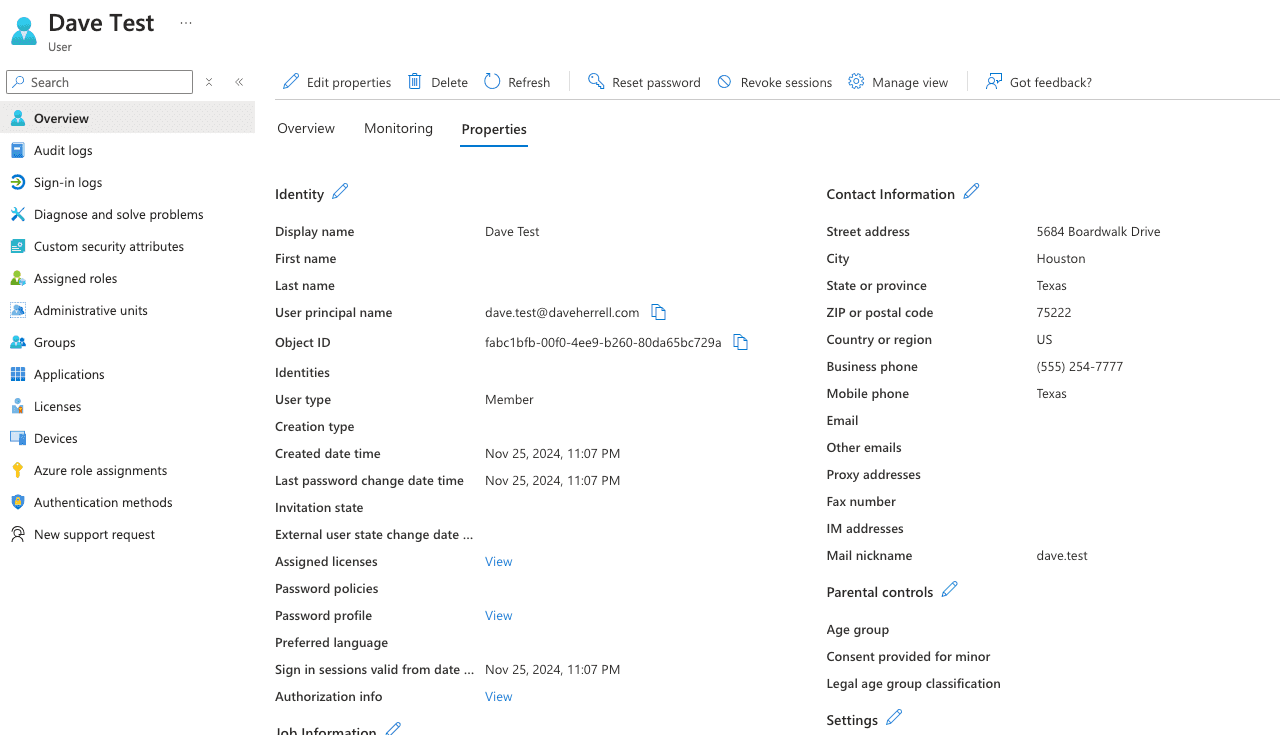
Last thing, you should see your updated user attributes within the Entra ID User area!
We have now updated Azure Entra user information using Jira automation!
By combining Jira Cloud Automation and Azure Runbook, you can efficiently automate the process of updating user attributes in Microsoft Entra ID based on changes in Jira Cloud. This streamlined approach saves time, reduces manual errors, and improves overall system management.
I hope you found this helpful!
![]()