

Jira Cloud: Boost Productivity with Saved Filters
In the fast-paced world of project management, Jira Cloud can quickly become a sea of tasks, issues, and projects. But fear not! There’s a simple yet powerful tool to help you navigate this digital ocean: Saved Filters.
With Saved Filters, you can create, save, and share your most-used JQL (Jira Query Language) queries. This means you can instantly access the specific information you need, whether it’s a list of high-priority tasks or a summary of recent bugs. No more endless scrolling or complex searches.
In this guide, I’ll show you how to:
- Craft Custom Filters: Build precise JQL queries to target the exact information you need.
- Save Your Work: Store your favorite filters for easy access whenever you need them.
- Share the Wealth: Collaborate with your team by sharing filters and insights.
By mastering Saved Filters, you’ll streamline your workflow, boost productivity, and finally regain control of your Jira experience. Let’s dive in!
What are Saved Filters in Jira?
Saved Filters in Jira are your secret weapon for efficient issue management. These pre-built JQL (Jira Query Language) searches let you quickly find the exact information you need, without the hassle of retyping complex queries.
What is JQL?
JQL is the language you use to craft powerful searches in Jira. It allows you to filter issues based on a wide range of criteria, such as:
- Assignee: Who’s responsible?
- Status: Is it open, closed, or in progress?
- Project: Which project does it belong to?
- Labels: What tags have been assigned?
- Due Date: When is it due?
Why Use Saved Filters?
- Save Time: Instantly access your frequently used searches.
- Increase Efficiency: Streamline your workflow and reduce manual effort.
- Improve Collaboration: Share filters with your team to align on priorities.
Ready to Dive Deeper?
I’ve created some resources to learn more about JQL and Saved Filters:
- Utilizing JQL Queries
- Quick List of JQL Queries you may find handy
Step 1: Create Your JQL Query
To start, let’s write a JQL query to retrieve a set of issues that you’d like to monitor regularly.
Example Query: Let’s say you want to see all unresolved bugs assigned to your team in a specific project.
project = "YourProjectKey" AND issuetype = Bug AND resolution = Unresolved AND assignee in (membersOf("daves-team"))This query searches for all unresolved bugs assigned to any member of “daves-team” in the specified project. You can adjust the criteria to meet your needs.
Step 2: Saving the Filter
Once you have the query set up, saving it as a filter is straightforward.
- Enter Your Query. I like to click in the Search bar at the top, then click View All Issues. You can also do this in many different areas within Jira.
- Type in Your JQL: Enter the JQL query in the search bar. Make sure it returns the issues you’re interested in.
- Save the Filter:
- To the left of the JQL bar, click on Save filter.
- Give your filter a descriptive name, such as “Unresolved Bugs for Daves Team.”
- Optionally, add a description to provide additional context.
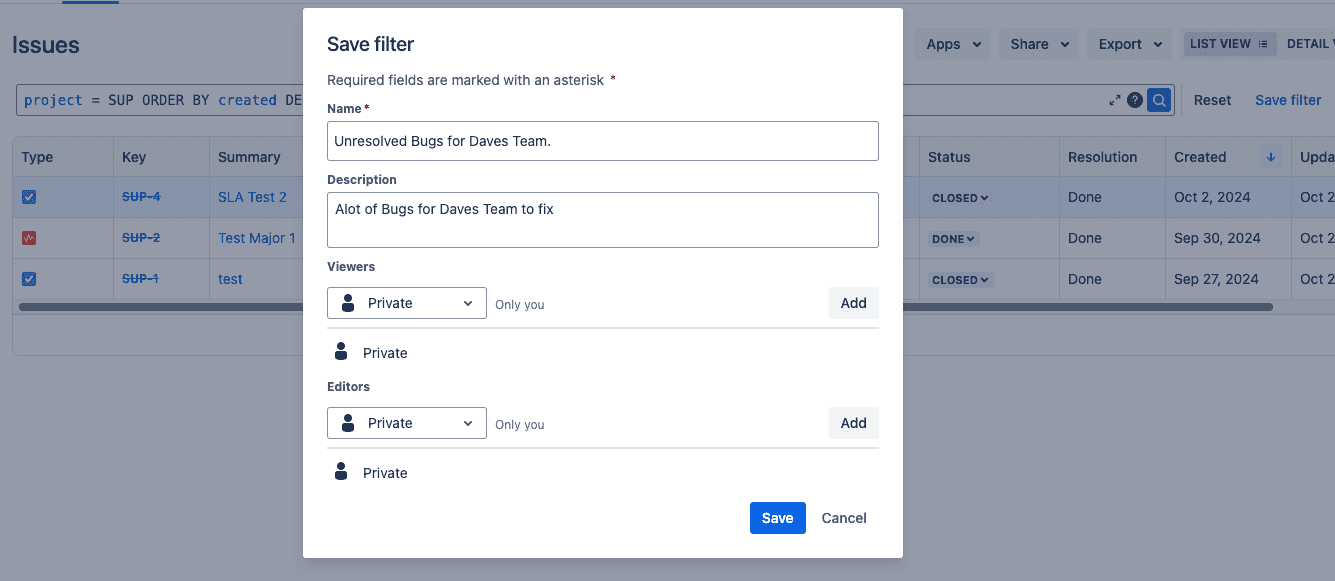
Your new filter is now saved and accessible under Filters > Your Filters.
Step 3: Sharing Your Filter
Sharing filters enables team members to access the same set of issues. You can configure the filter’s visibility and permissions:
- Navigate to Filters: Go to Filters > View All Filters and locate the filter you just saved.
- Set Your Permissions:
- Next to the filter name, click Filter details. Once that pops up, click on Edit Permissions.
- Under Views and Editors, Choose who can view or edit your filter:
- Private: Only you can see the filter.
- My Organization: Anyone within your organization can view it.
- Groups or Specific Users: Select specific teams or individuals who need access.
- Project: Only people with access to a certain project. Please note that they also need access to the project issues, if they cant see the project issue the filter wont be useful to them.
- Save Permissions: Click Save to apply your settings.
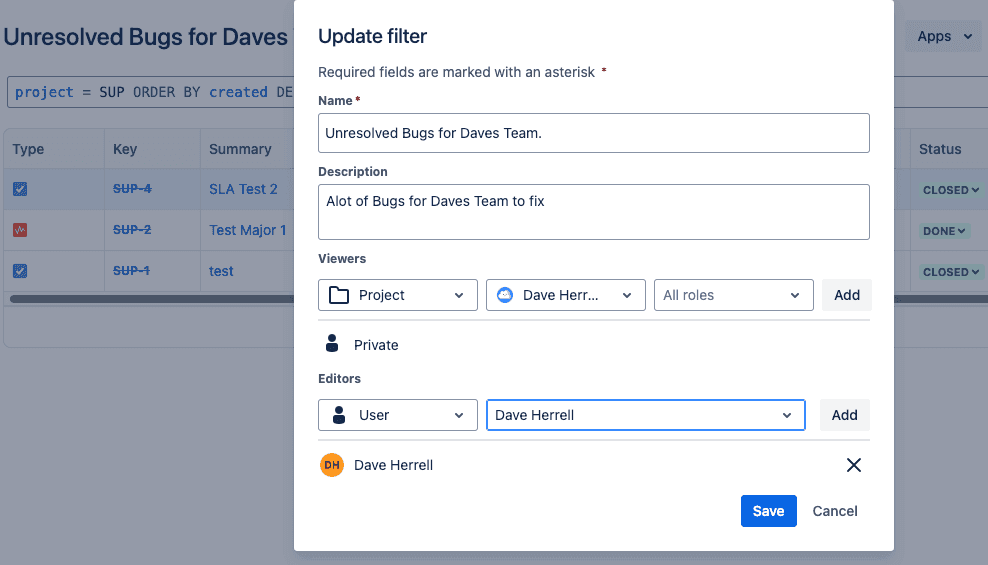
Now, anyone with access permissions can view/edit and use this filter, making collaboration easier!
You can also add saved filters to your Jira dashboards or set them up for email subscriptions to keep everyone updated on critical issues.
Saved Filters in Jira Cloud are an essential tool for anyone looking to boost productivity. By taking a few moments to set up and share filters, you create a repeatable, efficient workflow that benefits you and your team.
I hope you found it helpful!
![]()