

Jira Cloud: Disabling Entra ID User Accounts via Automation and Microsoft Runbook
- Log in to the Azure Portal.
- Navigate to Automation Accounts:
- Search for “Automation Accounts” in the search bar.
- Click + Create to set up a new Automation Account.
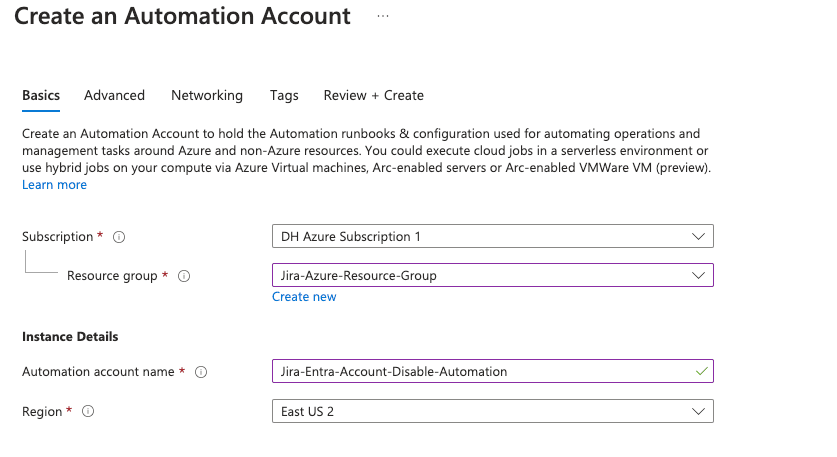
- Provide the required details:
- Subscription: Select your Azure subscription.
- Resource Group: Choose or create a resource group.
- Name: Enter a name for your Automation Account.
- Region: Select your preferred region.
- Click Next
- Under Advanced, choose System Assigned under Managed Identities. We will go over why this may be your best option later.
- Networking tab, ensure you have public access enabled for your connectivity configuration.
- Setup your Tags (Highly recommended for housekeeping).
- Click Review + Create and then Create.

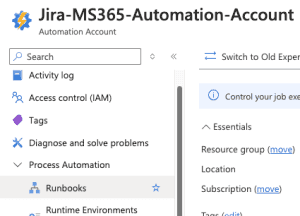
After your Automation Account has been created, Go to the resource.
Create Runbook
Let’s set up your new runbook. Under the Process Automation blade, click the arrow to expand and choose Runbooks.
You can delete the two tutorial runbooks if you wish. They are handy to look over for setup and ideas.
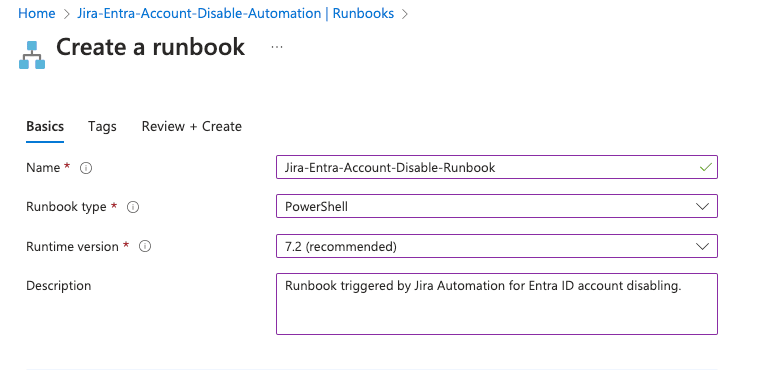
- Next, click + Create to create a new runbook.
Provide the needed details
- Click Create new.
- Enter a name for your runbook.
- Select PowerShell as the runbook type.
- Choose ‘Select from existing’ for the runtime environment and select PowerShell-7.2 (or the latest release). This will be necessary to use the MS Graph API.
- Add a description for your runbook.
- Optionally, add tags to categorize your runbook.
- Click Review + Create.
- Once validation is complete, click Create.
- Allow 2-3 minutes for the runbook to be created.
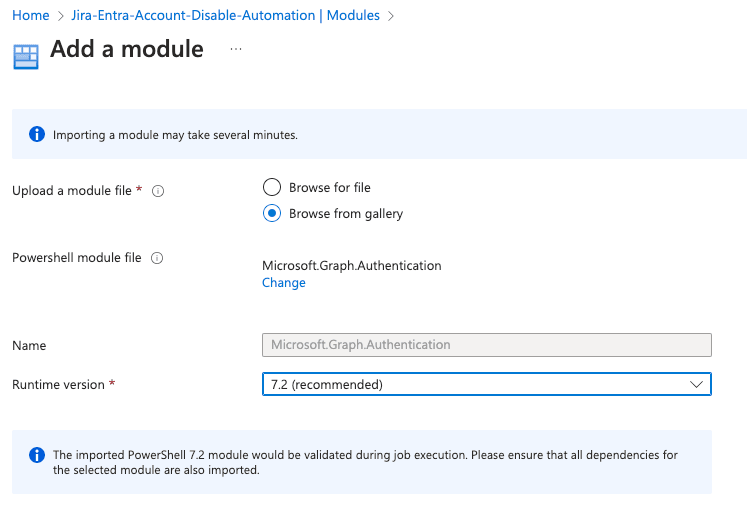
The runbook will need specific PowerShell modules that aren’t installed by default.
To add them:
- Click the + Add a module button at the top.

- Click ‘Browse from the gallery.’
- Search for ‘Microsoft.Graph.Authentication’ in the module gallery.
- Select the latest version of the module.
- Click
- Choose the latest runtime version for your module.
- Click Import.
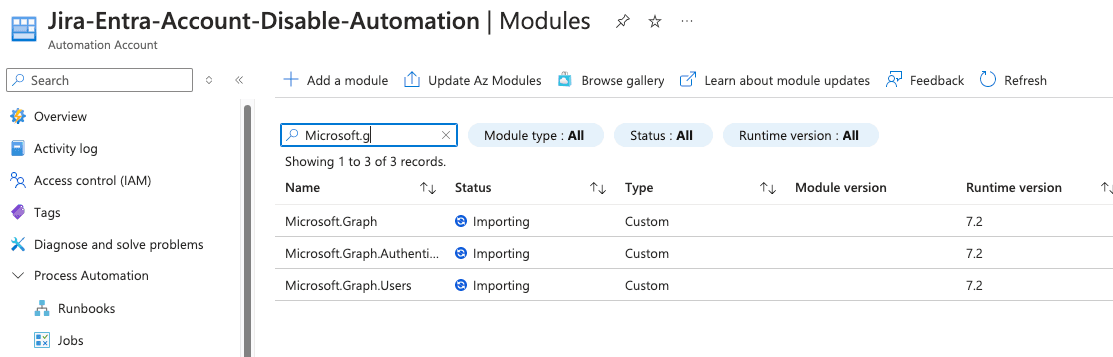
It might take around 2-4 minutes to import the Microsoft.Graph.Authentication module. You can check its progress by searching for it in the module gallery. Once it says Available, you’re ready to use it. We need to add two more modules, you can add these while the others are provisioning.
Add these other modules:
Microsoft.GraphMicrosoft.Graph.Users
Watch the status on the modules, once they say “Available” you are good to go.
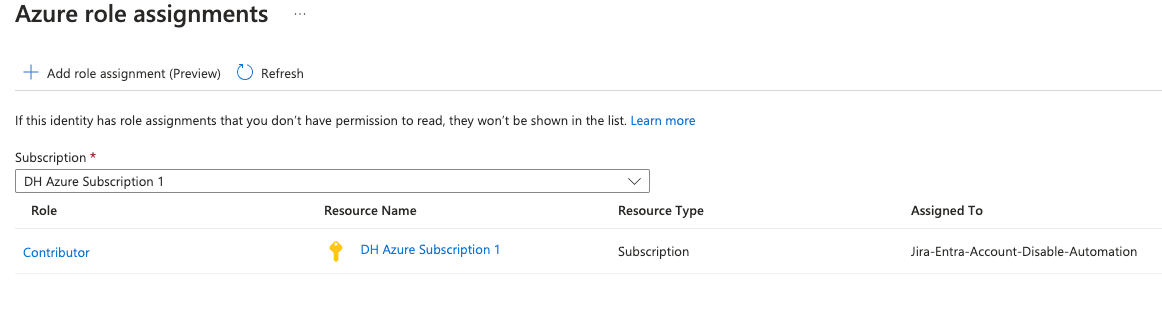
To enable your runbook to disable users, we need to grant it permission to the Azure subscription:
- Go to Account Settings, choose Identity.
- You’ll see a system-assigned managed identity is already enabled.
- Click Add role assignment.
- Set the scope to your Azure subscription.
- Assign the Contributor role (or create a custom role with necessary permissions which is recommended).
The Cloud console will run. Choose A for Yes to All to install all the required Graph modules. This will run for a few minutes.
It will then prompt you to Sign into a web browser and enter a code. Simply copy the URL (or you can click the URL) and type the code into your browser.
- Enter the code to allow access. Click Next.

- The next screen will ask you to sign into your account to verify.
- After you log in, you will need to consent on behalf of your company to give permissions to the Graph Command Line Tools. If you are okay with this, click Accept.

You can now close the tab where you granted admin consent. Return to the tab where your Azure Cloud Shell is running. The permission grant process should be complete, and your cloud shell should be disconnected from Microsoft Graph.
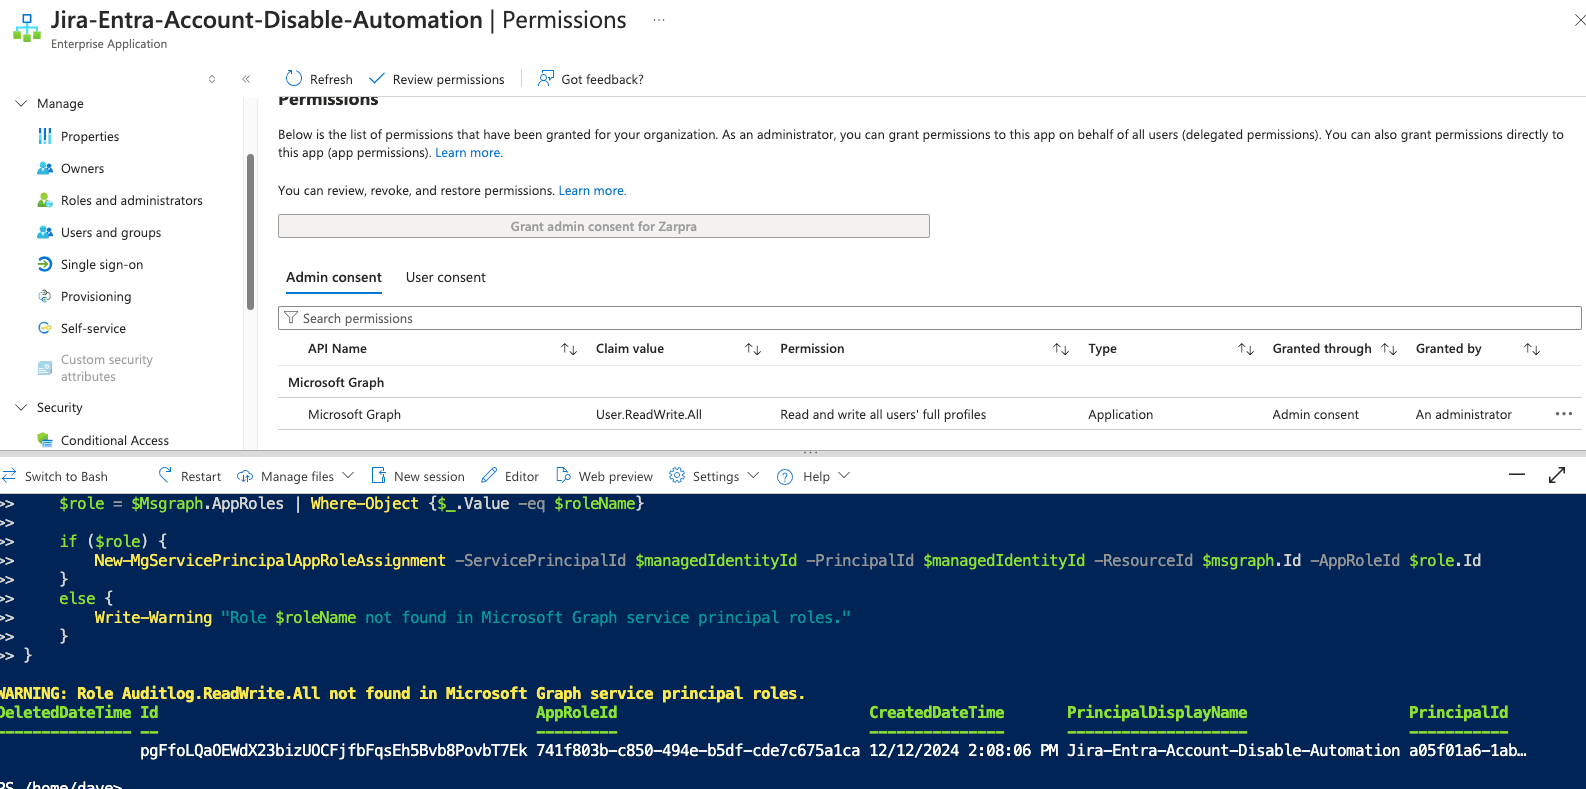
To verify that the permissions have been added successfully:
- Navigate back to the Permissions tab of your enterprise application.
- You should now see the new application permissions listed, with admin consent already granted.
Click Save. Click Publish. If you dont Publish the runbook it will stay in edit mode, Automation will not be able to work with the runbook.
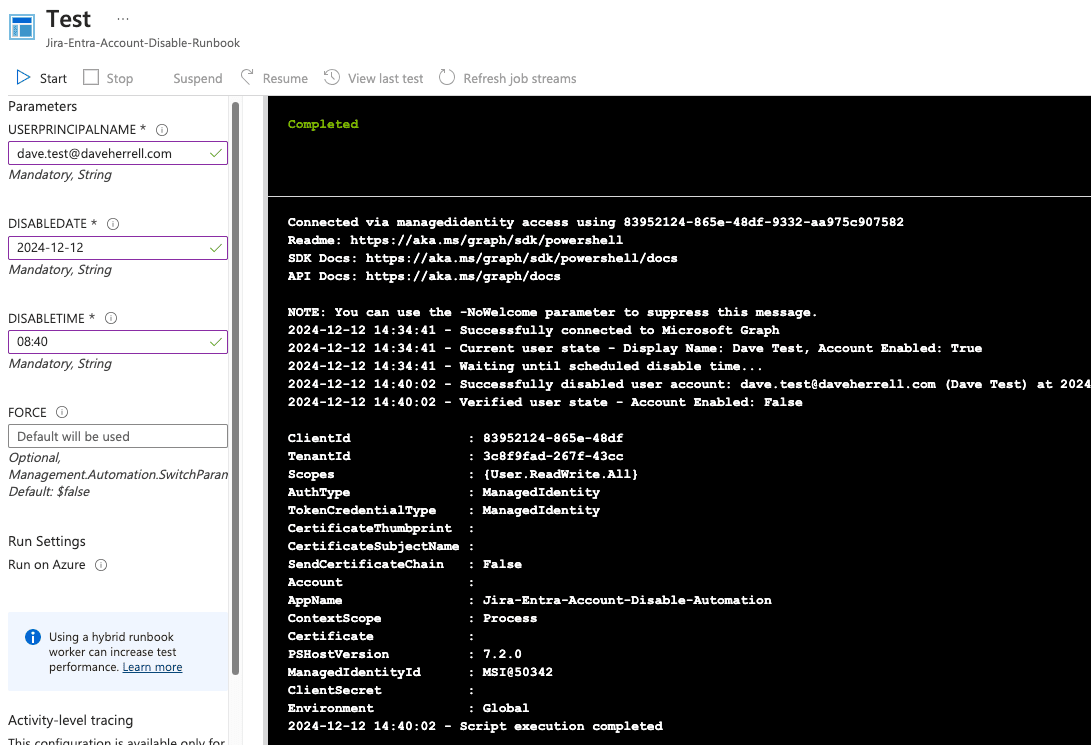
Test Runbook
Before proceeding, we should test our runbook to ensure it works as expected. After all, if it doesn’t work here, the Jira automation definitely wont work.
- In the runbook editor, navigate to the Test pane.
- Fill in the necessary parameters for the runbook to execute.
- Click the Start button to initiate the test.
- Please allow up to 3-5 minutes for the test to complete.
- Once the test finishes, review the output to verify that it ran successfully and without errors.
Within the Azure Portal, expand the Microsoft Entra bade, expand Manage, and choose Users. Search for the user we just tested against. There, you will should find your test user is now disabled.
- Click your Project settings and go to Automation.
- Choose Create Rule.
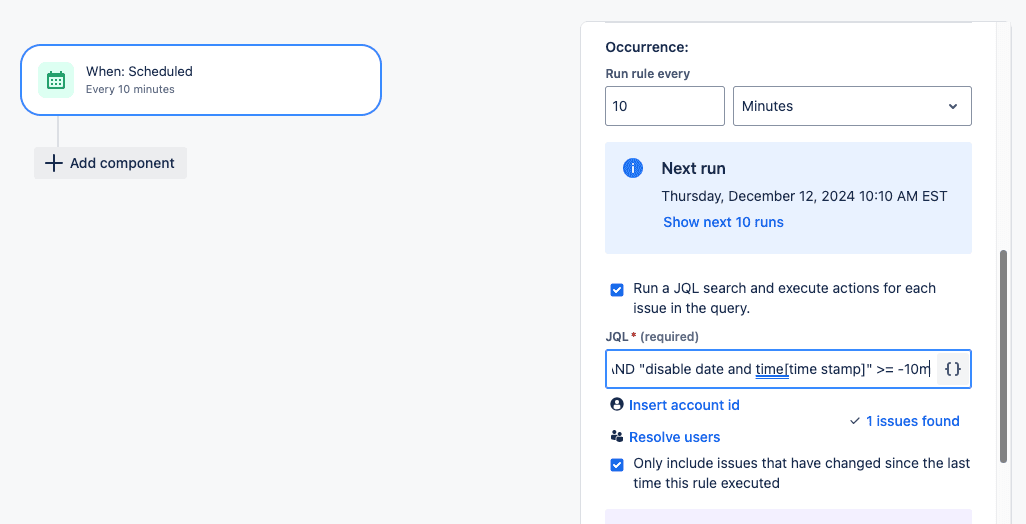
- Our trigger will be when the Scheduled; select this option.
- Occurrence, we’ll set to run every 10 minutes.
- Check the “Run a JQL search and execute actions for each issue in the query” this will expand out more options.
- Add your JQL. In our example we’re using this:
project = HR AND type = "HR: Off-board User" AND "disable date and time[time stamp]" >= -10m. - Check the option to “Only include issues that have changed since the last time this rule execute”.
- Click Next.
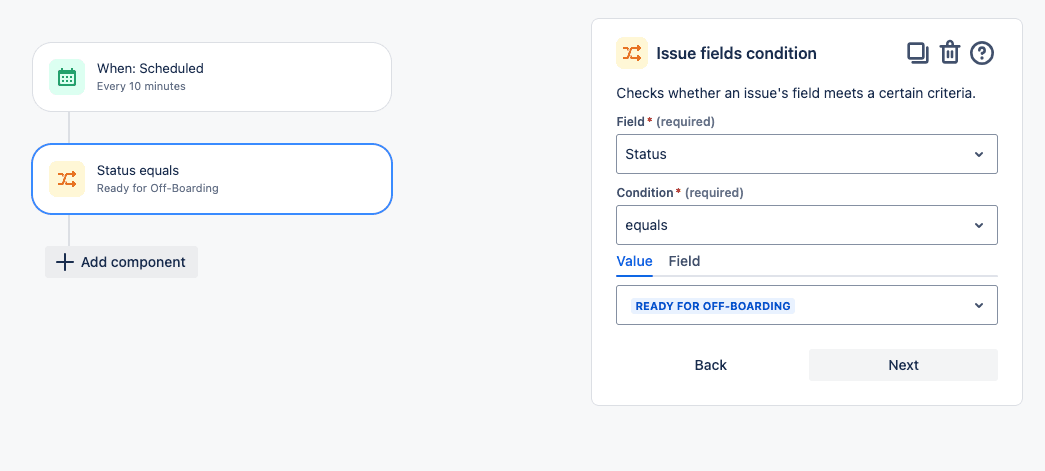
Let’s add another condition to ensure the status is in the Ready for Off-Boarding status.
- Add the IF: Add a condition
- Choose Issue fields condition.
- Under Field, we choose the Status.
- Condition, equals
- Value is Ready For Off-Boarding
- Click Next.
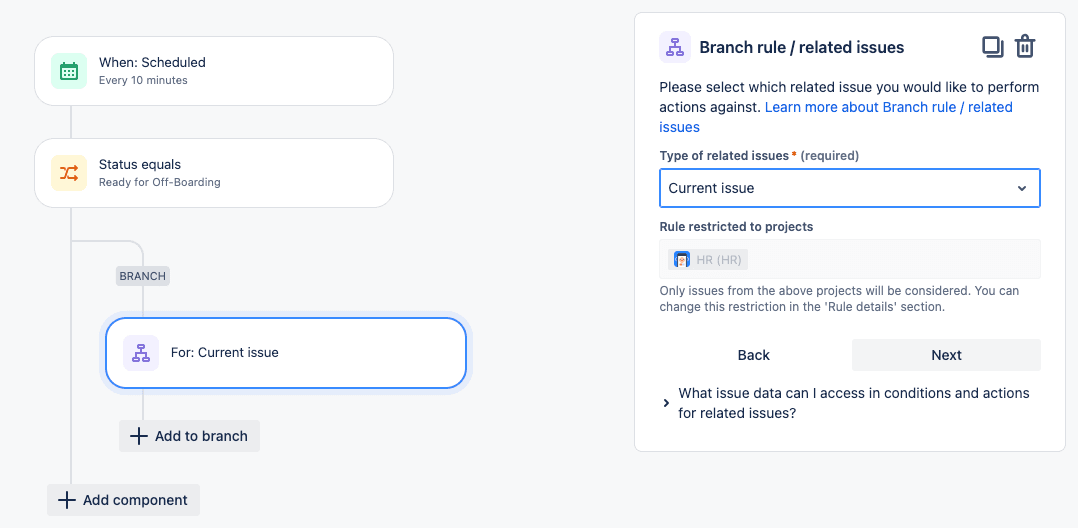
Add a branch component to work only off the issue that triggered it. Choose FOR EACH: Add a branch, and select the Branch rule / related issues. Choose Current Issue (default) on the next screen and click Next.
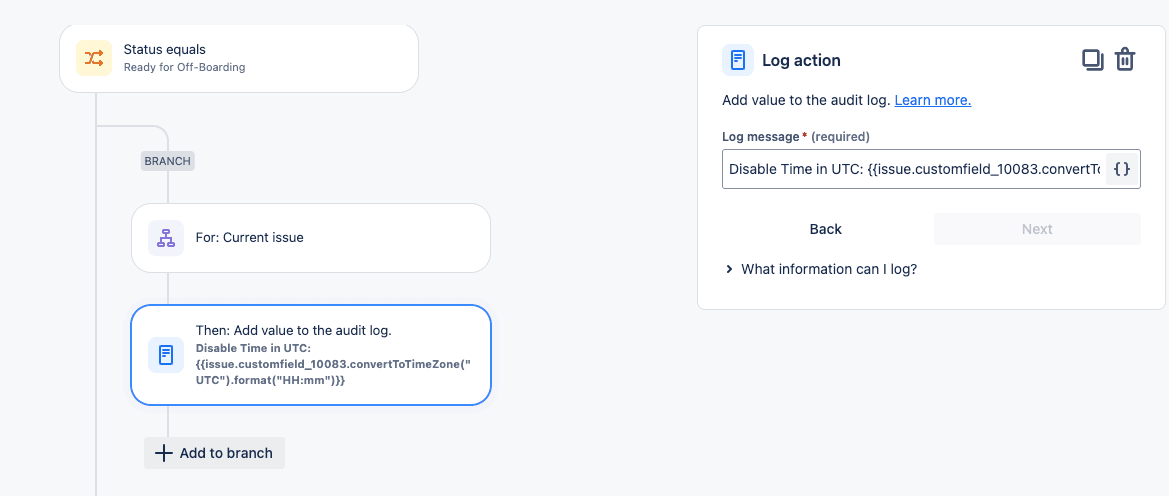
I’m a big proponent of logging inputs when using automation. It allows you to easily review the audit logs for any issues or information that maybe useful. We’re going to be splitting our custom data & time field into two queries for our runbook. I’m going to split these into log actions in case I need to review later.
- Click the + to add a Then: action, search for Log action.
- Add your log message. This is what we’ll be using for our example:
Disable Time in UTC: {{issue.customfield_10083.convertToTimeZone("UTC").format("HH:mm")}}
Let me explain why I am using this in a little more detail.
- I am using a custom date/time field in our ticket. The 10083 is simply the custom field id. If you need help finding this, check out my how-to guide here.
- .convertToTimeZone(“UTC”) is converting the time given in the ticket to UTC. Jira uses the users current time zone, so if you have users in multiple time zones, this is converting their inputed time to UTC for you. Taking a lot of the confusion or looking up UTC conversions. Our PowerShell script above is sending Azure the time in UTC. Of course you can adjust this if you want.
- .format(“HH.mm”) is taking the converted time and placing a four integer format to it. The capitalize HH is saying to give me the time in 24 hour (Military) time.
- Again, Click the + to add a Then: action, search for Log action.
- Add your log message. For this example we’re going to log pull the date in the format we need for Azure. Below is the example.
Disable Date: {{issue.customfield_10083.jqlDate}}
What we are doing is taking the same Jira date/time custom field and saying, we only want the date from this field. We dont care about the time. And we want it on the jqlDate time format, which is in the format of yyyy-mm-dd automatically. You can format time in many different ways for smart values. More information can be found on Jira’s documentation.

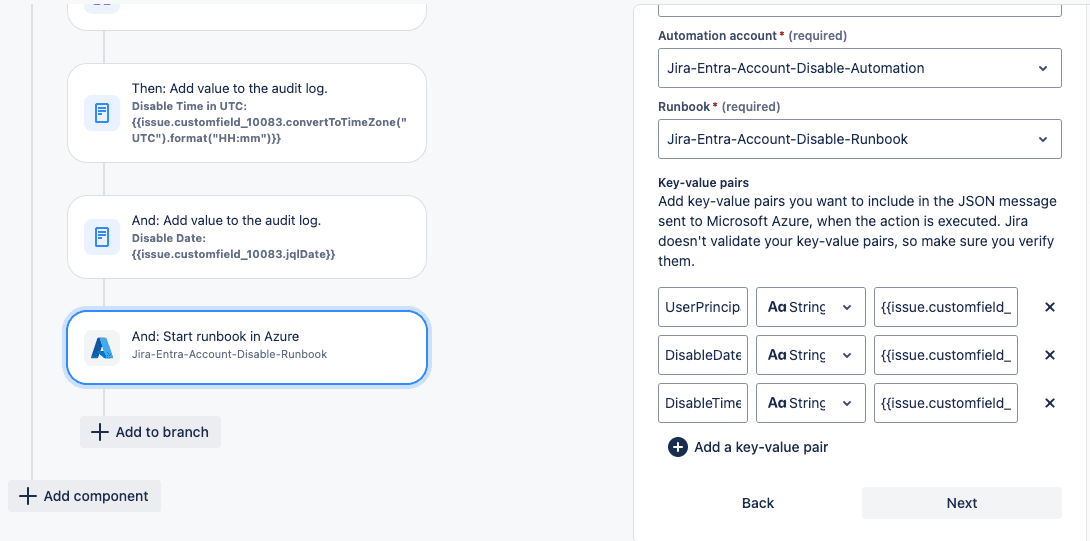
We now need to add Jira’s new Run Azure runbook action.
- Click the Add to branch under your new Branch. Select the THEN: add an action.
- Search or scroll down to the Start runbook in Azure and choose it.
- Next, we need to Connect our Azure account to our Jira account. Click the Connect This will open a new window.
- Sign in to your MS365 account if you’re not already signed in.
- Review and approve the permissions request on behalf of your organization. Click
- This tab should close out, taking you back to your Jira Automation

- Within Jira Automation, Select your Azure Subscription name
- Select the Resource Group that has your automation account.
- Select the Automation account that holds your runbook.
- Lastly, select the runbook we just set up.
The last thing we need to do is bind the Key-value pairs so the payload we send to Azure has the information to give to our runbook script.
We’re only mapping three things. The users UPN which is being entered via a custom Jira text field, the date and time which we’ll split off our date/time custom field.
The table below depicts how we’ll be mapping our key-value pairs.
UserPrincipalName | String | {{issue.customfield_10071}} |
DisableDate | String | {{issue.customfield_10083.jqlDate}} |
DisableTime | String | {{issue.customfield_10083.convertToTimeZone(“UTC”).format(“HH:mm”)}} |
Once you’ve added all your key-value pairs, select Next.
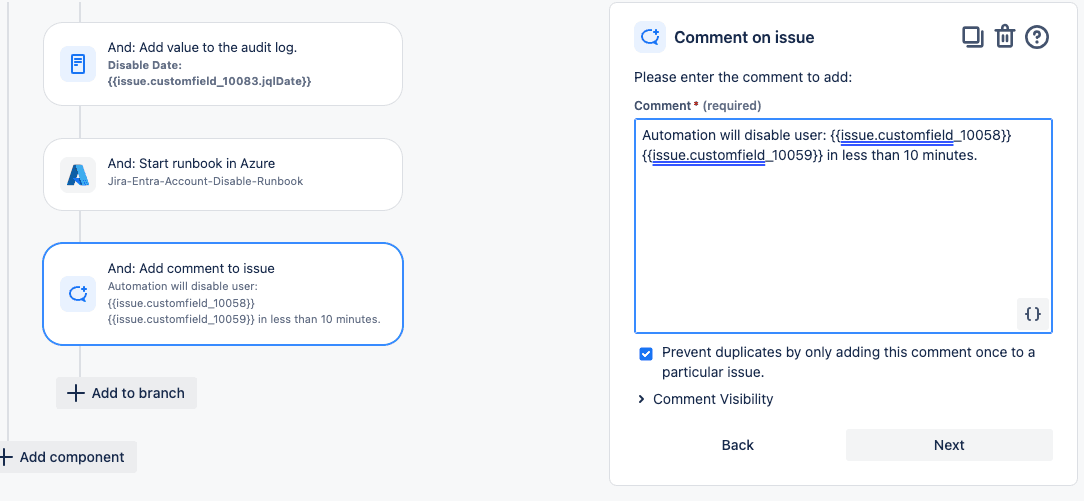
Lastly, I’m going to add a comment to the ticket to let the ticket reporter know the process is about to start. Needless to say, this can be a nice alert to ticket creator in case they need to hurry up and call this off, or extend it even, which does happen.
Select the THEN: add an action and search for add comment.
You can use Jira short codes to make this comment more personal. Here is my example, I’m using the custom fields in the ticket for the First and Last name in the comment:
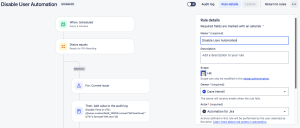
Last step, click the Rule Details at the top.
- Name your rule
- Set a description.
- Set the Automation Owner.
- Set the Actor (typically Automation for Jira). Something to note, in instances like an HR project, there should be Security rules setup for users to not see other ticket as an example, make sure the actor, even the Automation for Jira actor, if chosen, has been added to this Security rule and any other permissions needed such as ability to read the ticket and comment.
- Select if you want an email if this rule errors out.
- Who can edit the rule?
- Lastly, click Turn on Rule.
Let’s Test It!
The last thing to do is test our automation and runbook! We’ll test with the newly created HR Off-boarding test ticket with the required user information filled out.
Per our requirements, we’re going to transition the ticket from Review to Ready for Off-boarding.
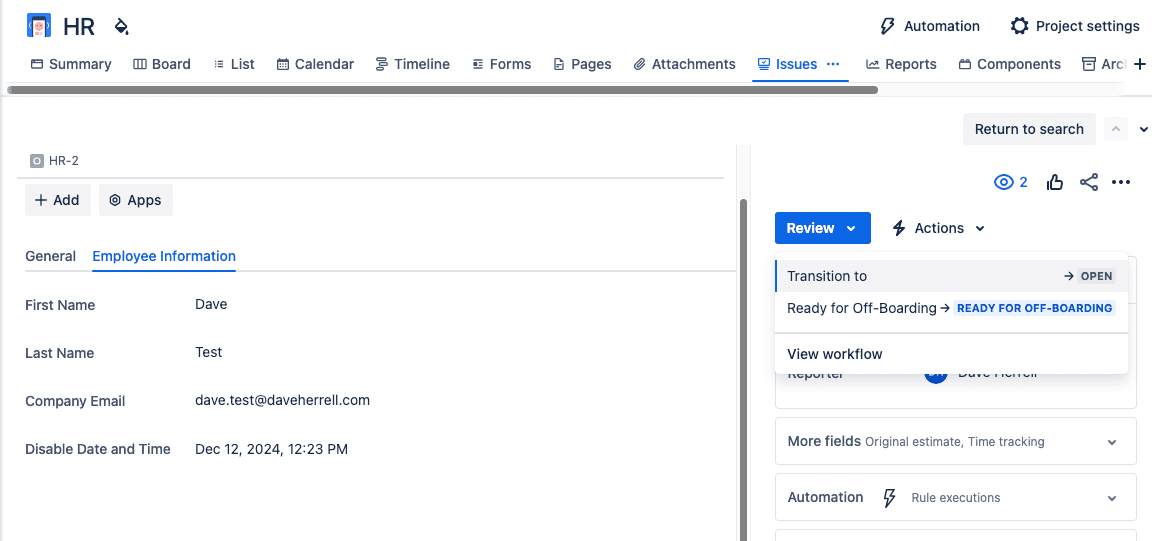
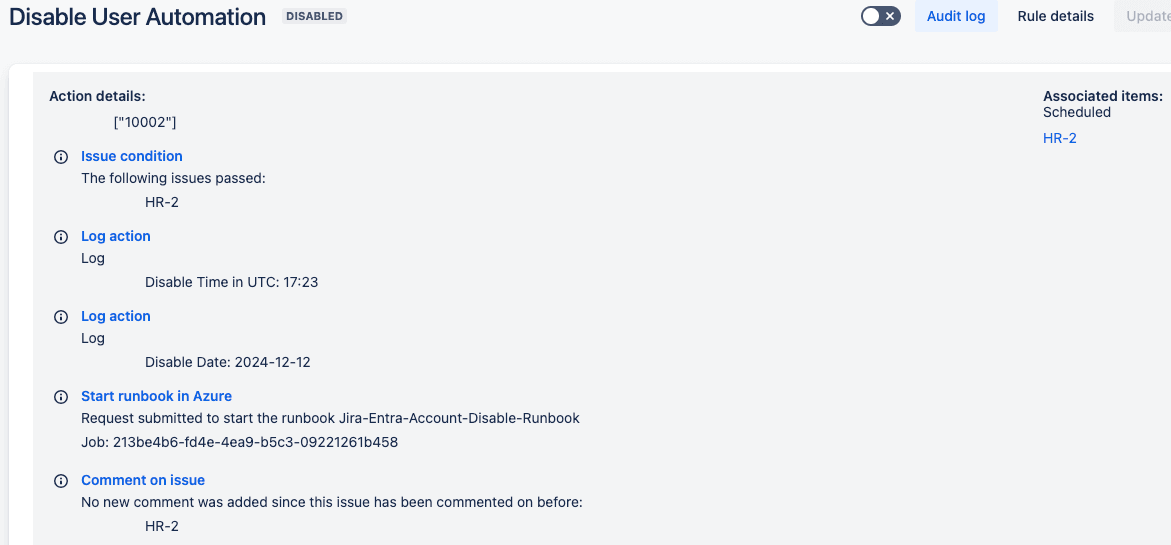
Once the scheduled time passes and the Automation sees this, it should kick off the Automation. We can go to our Audit log to see the two log inputs we added along with the Azure runbook request.
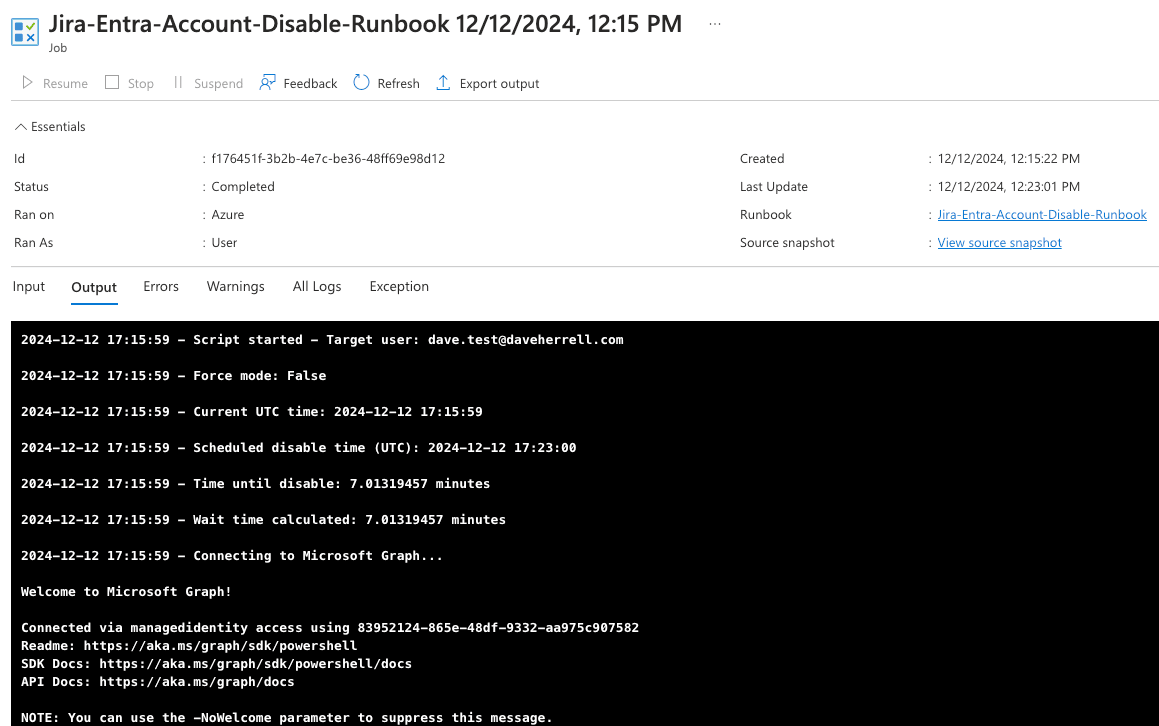
Back in the Azure portal, if we open our runbook, we should see our runbook either running or completed already. If you click the Completed Status, you will see our Inputs, Errors, etc.
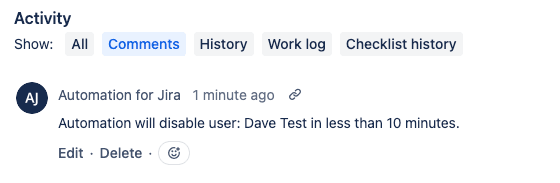
If we look at our ticket, there should be a comment left by our automation.
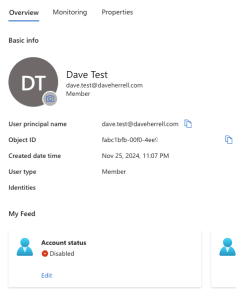
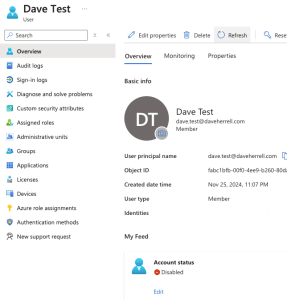
And of course, if we check out our Entra ID user, we should see the account has been disabled.
And there you have it. We have created a Jira Automation rule that triggers an Azure runbook to disable an Entra ID user.
Safeguards and Best Practices
While automating user disabling in Entra ID can significantly improve efficiency, it’s essential to consider potential risks. For example, malicious actors, such as disgruntled employees, could exploit this automation to disable critical accounts, including those of managers or even the CEO.
To mitigate these risks, implement the following safeguards:
- Robust Rules and Access Controls:
- Enforce strict permissions for Jira Automation and Azure Automation Runbooks.
- Limit access to only authorized the personnel that needs to have it.
- Create Jira Automation rules to deny if certain usernames are added, such as your C-suite or other managers. These probably should have a more one-on-one handling anyways.
- Detailed Audit Logs:
- Monitor all automation activities closely.
- Track who initiated the automation, the reason, and the affected accounts.
- Multiple Approvals:
- Require multiple approvals in the Jira workflow, especially for high-risk accounts.
- Implement a workflow that involves both HR and IT teams.
- Regular Reviews and Testing:
- Periodically review and test the automation to ensure it functions as intended.
- Identify and address potential vulnerabilities.
- Emergency Recovery Plan:
- Have a plan in place to restore disabled accounts in case of accidental or malicious disabling.
- Consider implementing a manual override process for critical situations.
Taking these precautions, you can safely and effectively leverage automation to streamline your user provisioning and de-provisioning processes.
By automating this process, your organization can save time, reduce manual errors, and ensure prompt action when disabling user accounts. With the power of Jira and Azure combined, IT workflows can become smarter and more efficient!
I hope you found this helpful!
![]()