

Jira Cloud: Easy Vendor Health Tracking and Labeling
If your HELP desk utilizes Jira or Jira Service Management (JSM) for your ticketing. An easy, and a very handy thing to do is setup incoming emails and basic automation to track various SaaS outages. By automating the tracking of SaaS outages (like Microsoft 365 or Slack), you can:
- Quickly identify and prioritize critical issues.
- Monitor vendor SLAs and ensure timely resolution.
- Reduce manual workload and improve efficiency.
Setup Alerts to Email
Go to the application or products status pages to setup alerts. For instance you can go here to sign up for the various Microsoft product alerts.
You want to setup the status alerts to go to an email you have setup for Jira to ingest and create a ticket. If you dont know how to do this, check this how-to guide out.
Setup Jira Automation
Within your Jira project, go to your automations area. Depending on your setup, you may need Project Administrator rights to access this.
Choose Create rule at the top right.
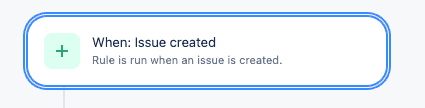
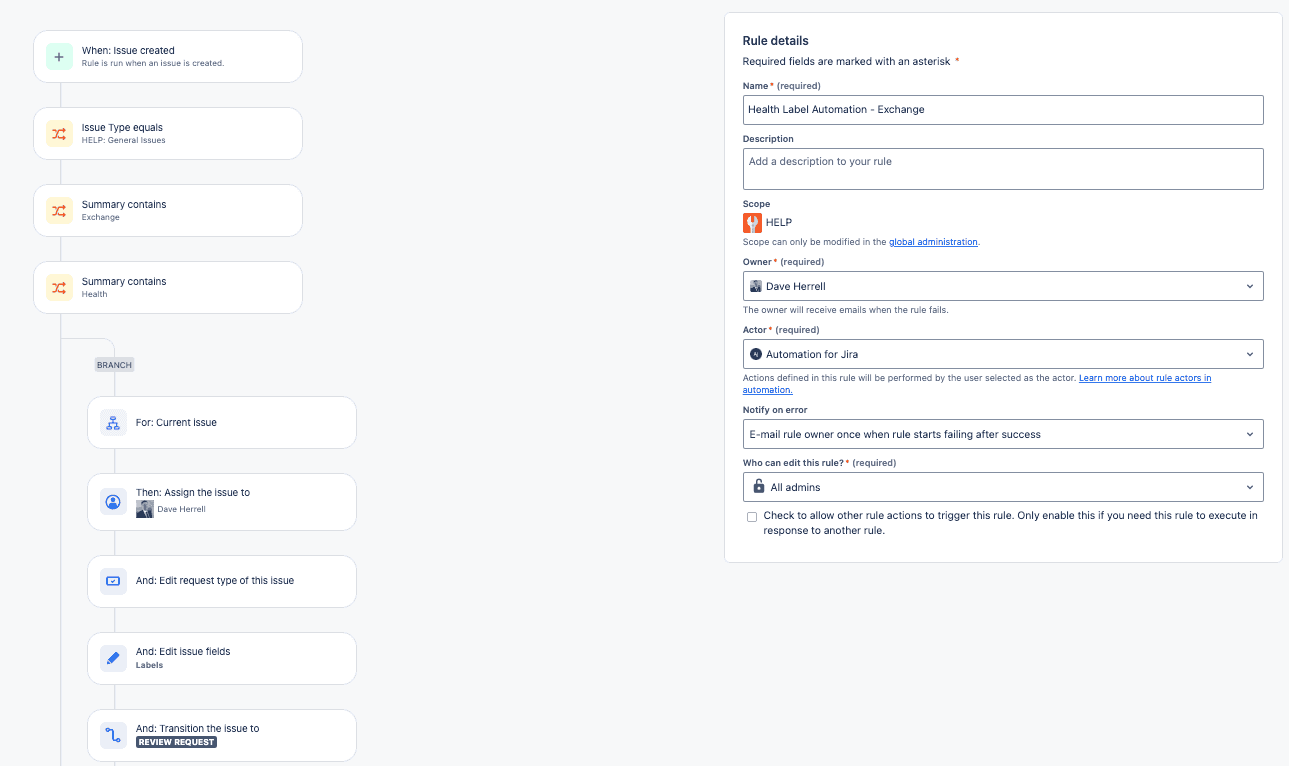
First, we need to create the trigger. In this case well choose, When: Issue created. Since Jira is already creating a ticket for the incoming email alert, this is the best option. Click Next.
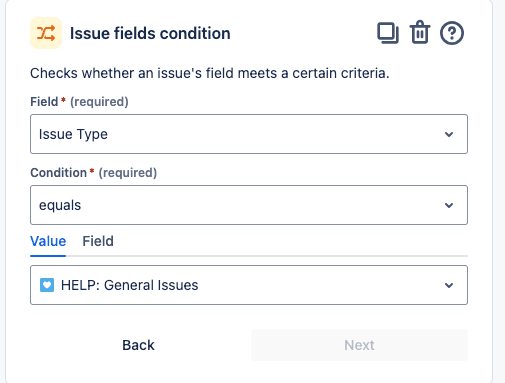
Second, we need to add conditions for this rule to help fine tune it. We will choose an IF condition of Issue Fields Condition. We will set this to watch only Issue Types of HELP: General Issues in our case. this is what type of ticket we setup Jira to create the incoming email under.
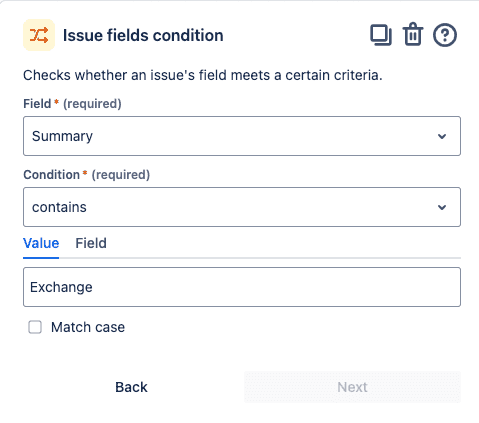
Let’s add another condition using the same Issue Fields Condition option. For this we’ll choose Summary and the condition as “contains” and value Exchange.
Create one last condition with the same type of field. Using the same Issues Fields Condition, choose Summary and the condition as “contains” and value Health.
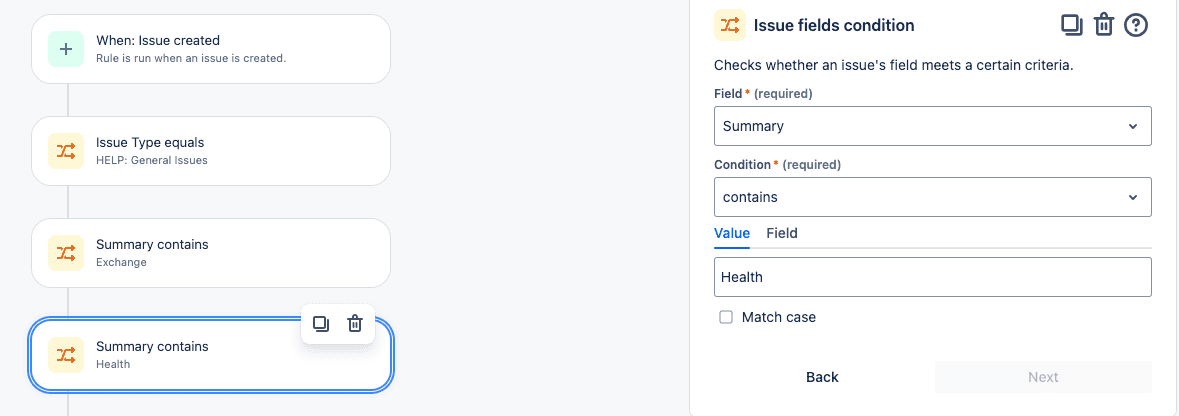
We’ve set up a trigger with three conditions:
- Project: The ticket must be created in the “HELP: General Issues” project.
- Summary: The ticket summary must contain the words “Exchange” and “Health.”
When these conditions are met, the automation rule will be activated!
Now it’s time to add our actions!
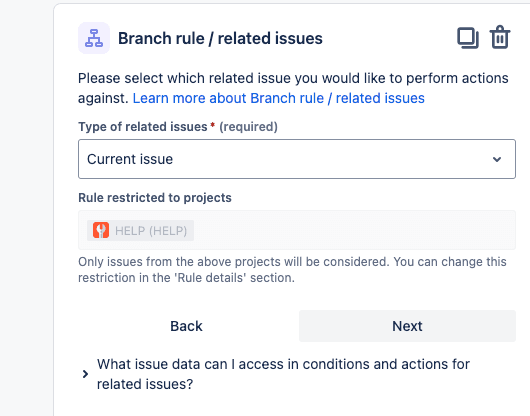
To ensure that our automation rule only affects the newly created ticket, we’ll create a branch:
- Add a Branch: Click “Add a branch” to introduce a new branch in your automation rule.
- Branch Rule: Select “Branch rule / related issues” as the branch type.
- Related Issue: Choose “Current issue” to target the specific ticket that triggered the automation.
- Next Step: Click “Next” to proceed with configuring the actions within this branch.
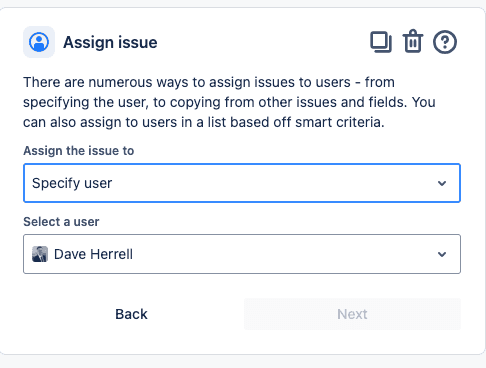
To automatically assign an issue to yourself upon creation or under specific conditions, follow these steps:
- Add an Action: Click “Add an action” to introduce a new step in your automation rule.
- Assign Issue: From the available actions, select “Assign Issue.”
- Specify Assignee:
- Under “Assign the issue to,” choose “Specify User.”
- In the “Select a user” field, select yourself as the assignee.
By following these steps, you’ll ensure that incoming issues are promptly assigned to you for efficient tracking and resolution.
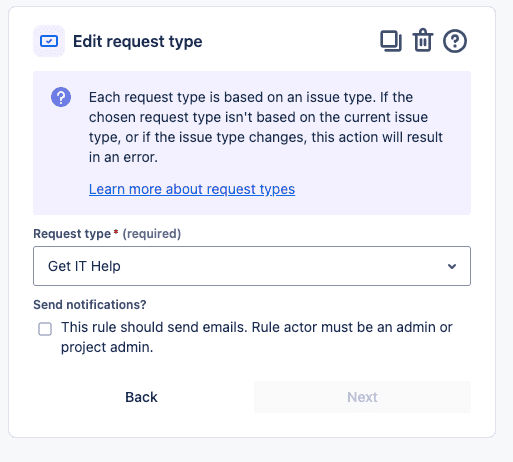
Since the project I am doing this under is a JSM project, I also want to edit the request type. If you are only using a Jira project you can ignore this step. Under add an action, choose Edit Request Type and choose the correct Request type and click next.
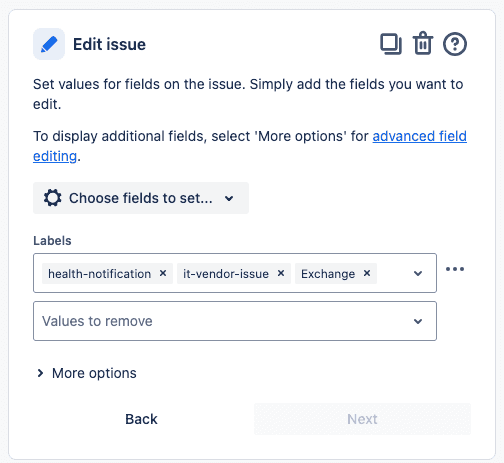
A handy feature within Jira are the use of labels. Jira labels are a powerful tool for organizing and categorizing issues. By strategically using labels, you can simplify JQL queries and dashboard creation.
To add labels to an automation rule:
- Add an Action: Click “Add an action” again.
- Edit Issue: Select “Edit Issue” from the action list.
- Choose Fields: In the “Choose fields to set” section, search for the “Labels” field.
- Add Labels: Enter the desired labels in the “Values to add” field, separating them with commas.
- Proceed: Click “Next” to continue.
One last action we want to setup, this of course is up to you and teams workflow. We’re going to transition this ticket automatically once the tickets created.
Choose Add an action. Search and choose Transition the issue to. Next choose your destination status.
Please note that your Jira workflow must allow direct transitions between the specified statuses. If the workflow doesn’t permit a direct move from the starting status to the destination status, the automation will fail.
Therefore, it’s crucial to review your workflow to ensure it supports the desired automation steps. This will prevent errors and guarantee smooth execution of your automation rules.
Once chosen, click next.
![]()
Last thing is to save your automation rule.
- Rule Details: Click “Rule details” in the top right corner.
- Name and Description: Assign a clear name and description to your rule for easy identification and future reference.
- Ownership and Permissions:
- Owner: Select the appropriate owner for the rule.
- Actor: Ensure the actor has the necessary permissions to edit issues in the project. The default “Automation for Jira” actor is recommended.
- Error Notifications: Configure how you want to be notified if the rule encounters errors.
- Edit Permissions: Determine who can edit the rule.
- Activate Rule: Click “Turn on rule” to enable the automation.
Each service you choose will send outage alerts differently. You may need to receive and analyze these alerts before setting up specific conditions in Jira.
Once you’ve received an outage alert and created a corresponding Jira ticket, you can automate various tasks:
- Labeling: Automatically tag the ticket with relevant labels (e.g., “Microsoft 365 Outage,” “Critical”).
- Status Updates: Transition the ticket through different statuses (e.g., “Open,” “In Progress,” “Resolved”).
- Notifications: Send notifications to relevant teams or individuals.
Advanced Automation
You can even implement more complex automation rules:
- Automated Resolution: If an email is received confirming service restoration, automatically close the ticket.
- Escalation: If an outage persists beyond a certain threshold, automatically escalate the ticket to a higher-tier support team or send Slack, Teams or other alerts as needed.
By automating these tasks, you can significantly improve your team’s response time to outages and reduce the manual effort involved in managing incidents.
Hope you found this helpful!
![]()