

Jira Cloud: Send Slack Alert Using Custom Field Trigger
Jira Cloud automation can significantly enhance your team’s efficiency, especially regarding notifications. One robust use case is sending targeted alerts to Slack or Teams. While direct Slack or Teams integrations offer basic notification capabilities, Jira automation provides greater flexibility and customization.
Creating a Custom Onboarding Alert
Let’s explore how to set up a basic triggered alert to Slack, sending notifications to two different channels to inform team members about upcoming onboarding. This automation will leverage a custom field as a trigger, empowering your HR department to initiate the alert once the onboarding process is complete.
Key Benefits:
- Targeted Notifications: Send specific alerts to relevant channels.
- Customizable Alerts: Tailor message content and formatting to suit your needs.
- Efficient Onboarding: Streamline the onboarding process with timely notifications.
- HR Efficiency: Automate alert triggers based on custom field updates.
Create Custom Field
To begin, you’ll need to create a custom field. For this example, we’ve made one named “Send Onboard Alert.” This custom field is a single-choice Select List field with the only option being “Send Onboard Alerts to Channels.” It is a very simple custom field.
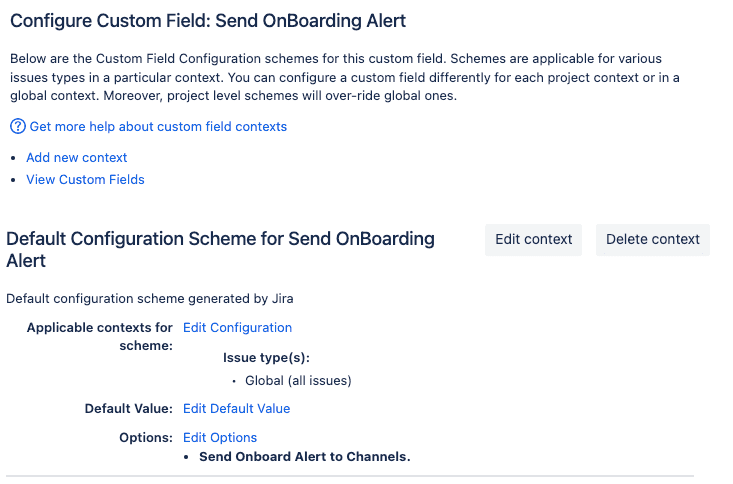
Make sure you add this field to any screens where you plan on utilizing this field.
Automation Setup
We can set up our automation once we have created our custom field. Go to the project in which the custom field will be utilized. Go to the project settings and find Automation. Click Create.
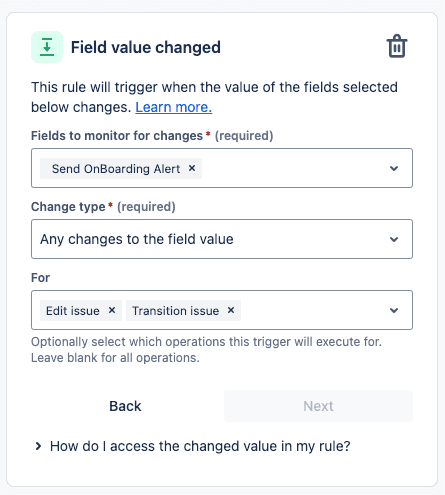
We want this alert sent if someone with rights changes the field from blank (default) to “Send Onboard Alerts to Channels.” To do this, we will use the trigger for the Field Value Change.
- Choose the Fields to monitor. In this case, our Send Onboard Alert field
- Change type: We will use any changes to the field value.
- For: We only want this during a ticked Edit or Transition.
- Click Next once complete.
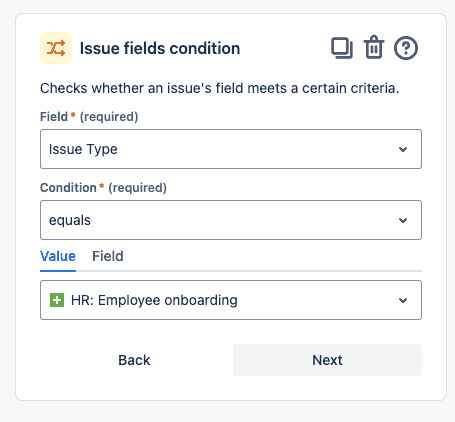
It’s time to set up our conditions and narrow down the criteria. To start, we will set a condition using the Issue fields condition.
- Field: We’ll choose the Issue type
- Condition: Equals (We want it to be precisely this only).
- Value: Choose the Issue Type. In this case, our HR project has an onboarding issue type.
- Click Next.
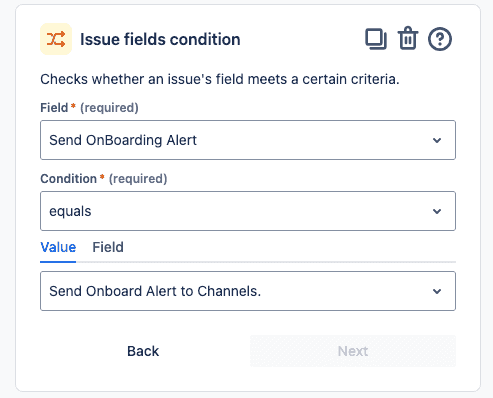
We will add one more condition using the same type of Issue Fields Condition.
- Field: We want to watch the Send Onboard Alert field.
- Condition: Equals
- Value: We’ll choose the only value on our custom Send Onboard Alert to Channels field.
- Click Next
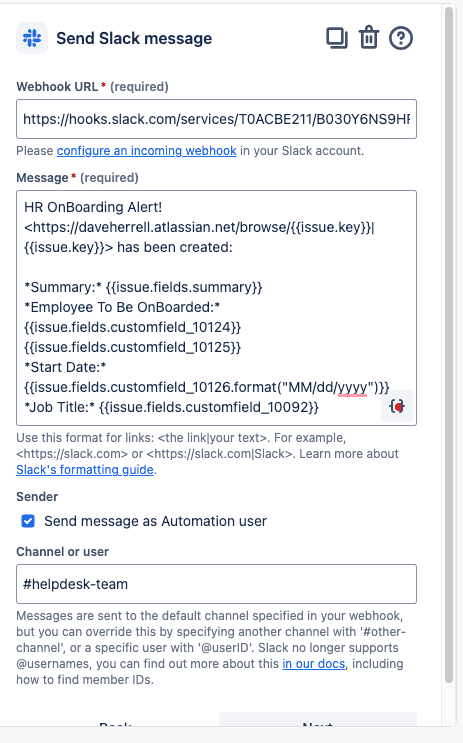
It’s time to set up our first Slack Alert. Choose THEN: Add an action, and find the Send Slack message.
You will need a Slack Webhook URL, preferably one for each channel alert.
Next, create your message. You can use Jira markup for the fields you wish to use. Ensure you keep to Slack’s format guide for anything out of scope you may want to do.
Here is our message example:
This sends an alert that gives the Summary, Custom fields of the employee’s first and last name (your custom field number will vary), the date set on a custom field for the start date, and the information from a custom field on their Job title. As you can see, you can choose whatever information within the ticket you wish to alert your channel about!
Lastly, choose to send the message as an Automation user and select the channel name. We will send this first alert to our Helpdesk Team so they can be informed.
Click Next once you’ve completed everything.
Since we want this to go to two different channels, we will create another THEN: Add an action task. We’ll choose the same Send Slack Message function.
As above, you can fill out the necessary information. In our case, we sent a message to the HR Hiring Team to ensure they’re all aware of a new onboarding happening soon.
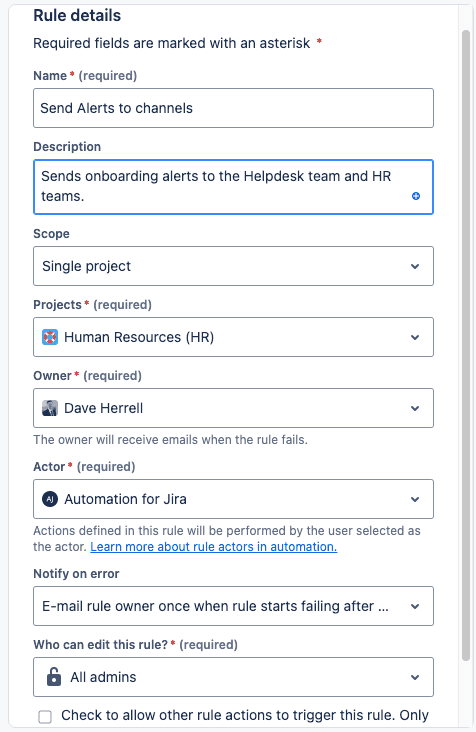
Once complete, click Rule details at the top right.
Fill out the Automation rule name description (please do this for housekeeping).
The scope, projects, and other fields will be up to you and your workflow needs.
Once complete, choose Update or Save. Turn the rule on, and you will be ready to test and use your new alert field! A straightforward way to set up Slack alerts.
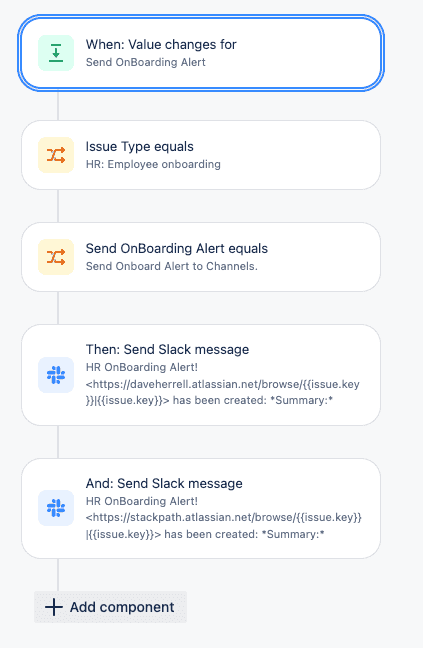
Here is what your automation workflow should look like:
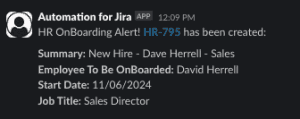
Within your Slack channel, you should receive an alert similar to this:
I hope you found this helpful!
![]()